Verify
The Verify mode of a project is where you test your software component against a message sequence model so you can be more confident that your software is doing what it's supposed to do.
How it works
Tangram Pro™ tests a single software component based on its "interface": the message it sends and receives, the order of those messages, and their contents.
Tangram Pro™ will run your component software in isolation to test it, and run an environment that acts as the inverse of the model to emulate the rest of the system: when the component expects to receive a message, Tangram Pro sends it, and vice versa. This information is detailed in a component sequences, which contains relevant details about the messages, their ordering, and any requirements for their contents. Tangram Pro can do "validity" checks to test that a component handles messages correctly, as well as "invalidity" checks to see what the component does when it receives bad messages. At the end, Tangram Pro generates a report containing the results of testing.
Component Software
To test a component in Tangram Pro™, your component will need to use one of the supported transport types.
To prepare a container image with your component binary, you can either:
- Use Tangram Pro™ to create a container: Go to the Build mode of your project, link your component to your code repository and complete a containerized build.
- Or provide your own container image: Create a container image that runs your component as the entrypoint command, and push the image to your registry. You can authorize Tangram Pro to pull the image from your registry.
Component Sequences
A sequence is an ordered list of messages that will be input to your component-under-test, and messages that are expected to be output by it. You can add multiple sequences to cover as many test scenarios as you need.
A sequence details:
- The type of messages the component should be able to send and receive
- The order in which the component is expected to be able to handle those messages
- The contents of the message fields
The sequence model includes the ability to define robust and powerful constraints to define the ranges of valid values for message fields. These constraints can be simple static values, ranges of values, or can even be based on the contents of other fields within the same message or from other prior messages in the sequence. Field constraints can include expressions, which allow the user to insert math expressions into their message data validations.
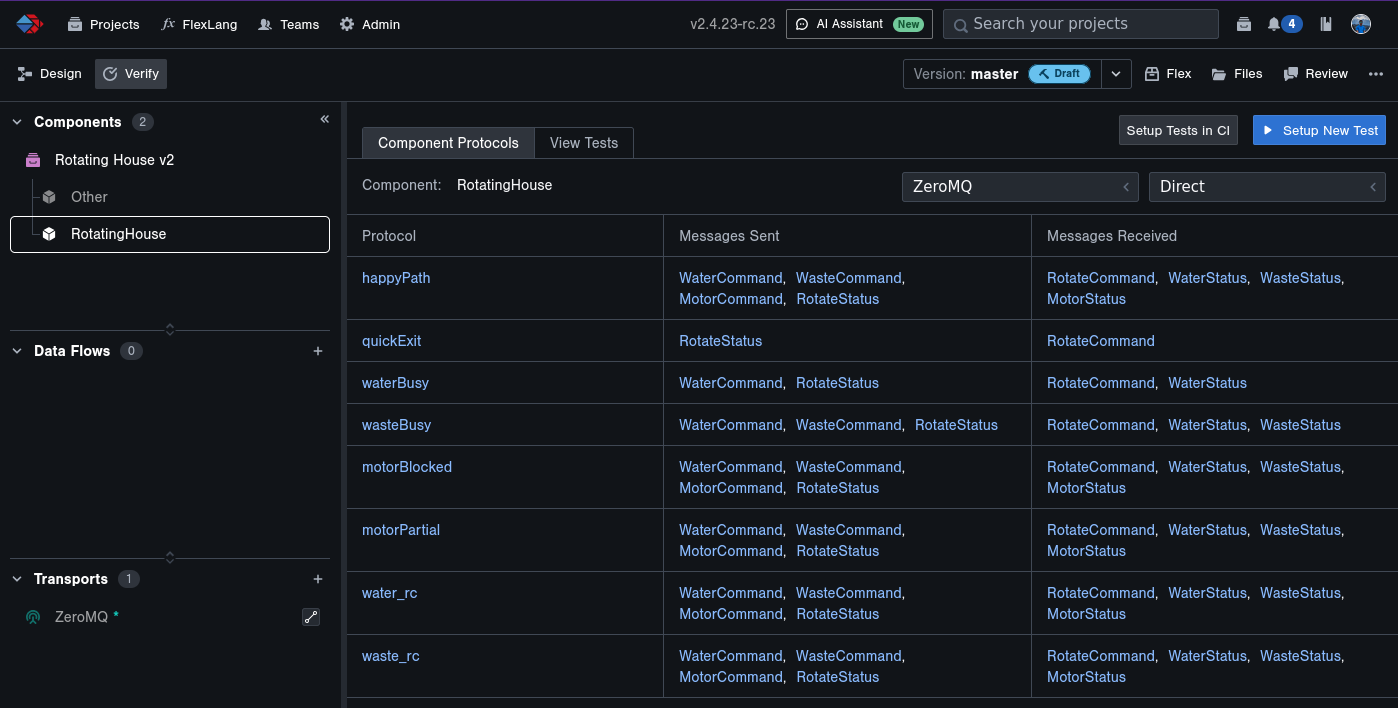
To create a sequence:
- Open a project and go to Verify
- Select a component and click the Component Sequences tab
- Click Add Sequence
- Click Add Initial Sequence Message and choose the first message that you want to either be input to your component-under-test or output by it
Sequence Messages
Each message in a sequence includes these properties:
- Interface Message: The name of the message to send or receive
- Direction: "Input" messages are generated by Tangram Pro's test environment and sent to your software component. "Output" messages are what Tangram Pro expects to receive from your software component.
- Transport: The type of connection, or message broker, to use with your software component to send/receive messages
- Topic: The name of a topic the message should be subscribed to (Default provided)
- Message ID: The id of the message (Default provided)
Once added, a message can have constraints applied to it.
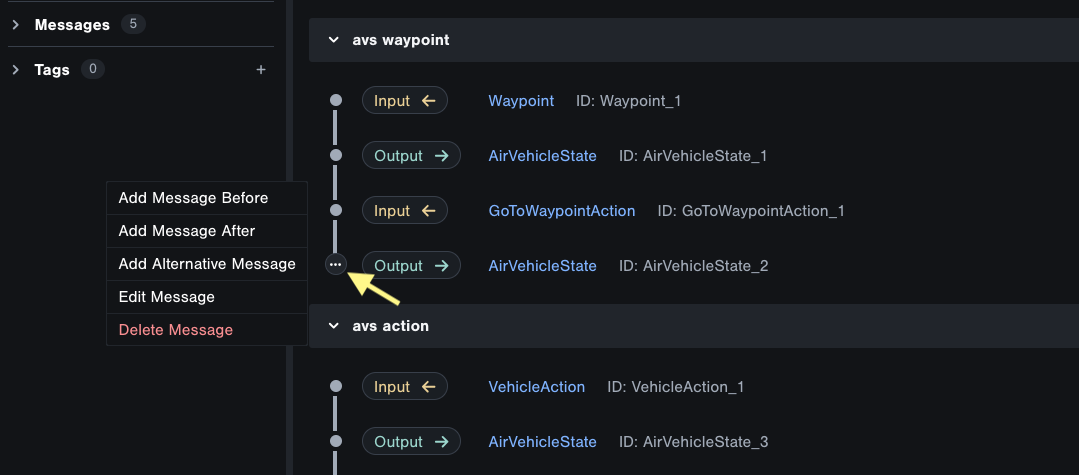
To add a message
- Click the plus icon, or the dot to the left of any message in the sequence
- Choose Add Message Before or Add Message After
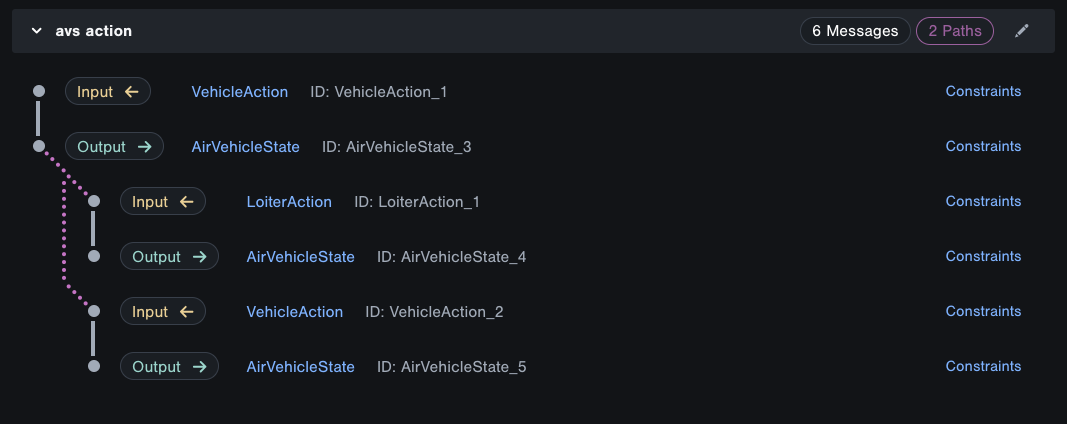
Alternate Message Paths
You can define alternate message paths in a sequence, which is like adding an OR statement to the message sequence model.
When the sequence is tested, instead of verifying that the next message in the sequence is only "Message A", an alternate message lets you verify that the next message is either "Message A" or "Message B". Then, if "Message A" was received, Tangram Pro will test the sequence that's defined under "Message A". Or, if "Message B" was received, Tangram Pro will test the sequence that's defined under "Message B".
To create an alternate message path
- Click on the dot to the left of the message that you want to define an alternate for
- Choose Add Alternate Message
- You can then add messages to each separate path as needed
Duplicate Sequences
You can create a copy of a sequence, including its constraints, by clicking the Duplicate icon on the top right of a sequence.
Message Templates and Constraints
Constraints
Each message in a sequence can have constraints. By adding constraints, messages can be called "valid" or "invalid" based on their contents, including how the messages of one field relate to a message that came previously in a sequence.
- Add constraints to Input messages to set field values in the incoming message.
- Add constraints to Output messages to test field values sent by your software.
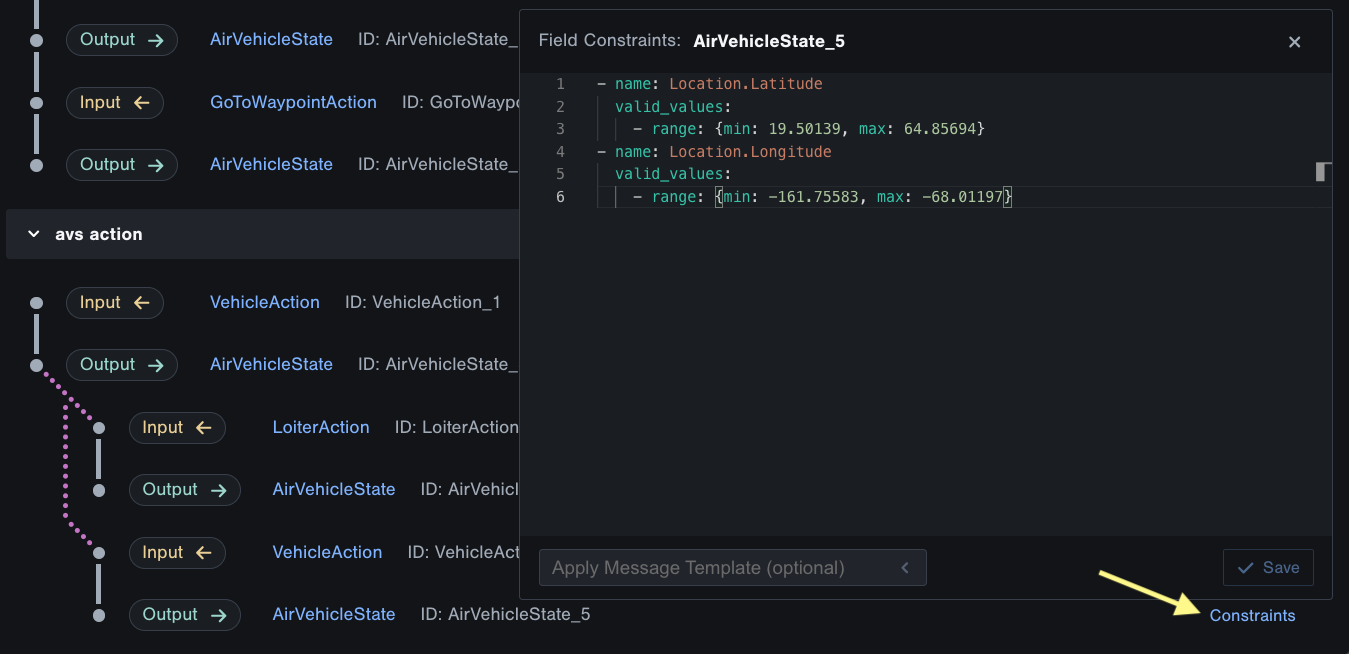
To add constraints:
- Locate a message in a sequence and click the Constraints link beside it
- Type in constraints yaml, apply a message template, or both!
If you do both, apply a message template and type in constraints, the typed-in constraints will override any constraints from the template if the field names match.
Message Templates
You can create message templates to save the constraints that you need to re-use, and apply them to multiple occurences of a message. Templates allow for reduced yaml duplication as well as a reproducible way to apply constraints to list and complex types.
To add a message template:
- Click the Message Templates button in the top right
- Choose the package and message
- Type in constraints yaml and save
It can now be applied to any matching messages in the sequence
Constraints YAML
Field constraints are specified as a list of objects in YAML format.
Each constraint object may have:
name: (Required) The name of the field, which should precisely match the name specified in Flexvalid_values: Optional A list of constraints designating valid values for the fieldinvalid_values: Optional A list of constraints designating invalid values for the field
Each valid or invalid constraint may be one of:
value: A single value or expressionrange: Not available for strings or lists of strings A range of values or expressionsmin: Minimum allowed value, which is a type-appropriate default if not setmax: Maximum allowed value, which is a type-appropriate default if not setminInclusive: Optional, defaults to true The range includes the minimum value iftrue, or excludes it iffalsemaxInclusive: Optional, defaults to true The range includes the maximum value iftrue, or excludes it iffalse
string_length: Only for strings Sets the allowable length for the value when generated by Verifiermin: Minimum number of values, which is a type-appropriate default if not setmax: Maximum allowed value, which is a type-appropriate default if not setfixed: Maximum allowed value, which is a type-appropriate default if not set
list_length: Only for lists Sets the allowable number of values when generated by Verifiermin: Minimum number of allowed valuesmax: Maximum number of allowed valuesfixed: Fixed number of types allowed
anyOf: A list of available message templates to specify sub ranges or inherited type to fill out list. See examples here.indices: A map to specify a specific message template out an index in a list of items. See examples here.
Each value specified in a constraint should match the type of the field being constrained. Trying to constrain a float32-typed field with a string would be invalid.
Example Field Constraints
For a usage example, consider the following Flex messages:
extensible struct InnerThing {
    secret: int32;
}
struct InnerThingDerivedA extends InnerThing {
    longSecret: int64;
}
struct InnerThingDerivedB extends InnerThing {
    shortSecret: int8;
}

message struct ThingA {
    fieldJ: int32;
    fieldK: string;
    fieldL: int32;
}

message struct ThingB {
    fieldX: float64;
    fieldY: int32;
    inner: InnerThing;
}

message struct ThingC {
    fieldX: float64;
    fieldY: int32;
    inner: InnerThing[];
}
Each constraint may include either values or expressions. Values look as you would expect:
# constraints for message "ThingA":
- name: fieldJ
  valid_values:
    - value: 10
    - range: {min: 20, max: 40, minInclusive: false}
- name: fieldK
  valid_values:
    - value: "abcdefg"

# constraints for message "ThingB":
- name: fieldX
  valid_values:
    - range: {min: -100.0, max: 100.0}
  invalid_values:
    - range: {min: -1.0, max: 1.0}
Expressions allow dynamic reference to other fields within the same message or fields from other, previously received messages.
Let's assume that the message sequence will look like ThingA -> ThingB in our example below:
# constraints for message "ThingA":
- name: fieldJ
  valid_values:
    - range: {min: 20, max: 40, minInclusive: false}
- name: fieldL
  valid_values:
    - range: {min: fieldJ, max: 80}

# constraints for message "ThingB":
- name: fieldX
  valid_values:
    - range: {min: abs(ThingA.fieldJ) * 2, max: ceil(abs(ThingA.fieldJ) * 3.8)}
There are two more important requirements for expressions:
- Recursive requirements in constraints are not allowed, if FieldB uses FieldA in an expression, FieldA cannot use FieldB in an expression.
- Only fields of messages that came previously in a sequence may be referenced. In the above examples, we assume for brevity that a sequence was described later such as
ThingA -> ThingB
Expression ID Syntax
Fields within the same message can usually be simply addressed by name. However, if referencing a nested field (like in the example below), you'll need to prepend
the field name with self in expressions. Fields in other messages need to be prepended with the message ID.
Nested Field Example:
# constraints for message "ThingB":

# Notice we don't need `self` in front of the field name in the `name` attribute, because we can only be setting field constraints for the current message
- name: inner.secret
  valid_values:
    - value: 20
- name: fieldX
  valid_values:
    # However, whenever there's a `.` in an expression, we could be referencing another message, so we need a `self` to distinguish which message the field is in
    - value: self.inner.secret
Templates allow for reduced yaml duplication as well as a reproducible way to apply comtraints to list and complex types.
Let's assume that the message sequence will look like ThingA -> ThingC in our example below:
# constraints for message "ThingA":
- name: fieldJ
  valid_values:
    - range: {min: 20, max: 40, minInclusive: false}
- name: fieldL
  valid_values:
    - range: {min: fieldJ, max: 80}

# constraints for message "ThingC":
- name: inner
  valid_values:
    - list_length:
      min: 3
      max: 4
    - indices:
      0: ITDA1
      1: ITDB1
    - anyOf: [ITDA1,ITDB1]
    # where ITDA1 and ITDB1 are template names
There are some important considerations when using message template:
-
Expressions are only allowed with in the template scope, for the example above expressions in ITDA1 could not reference fields within ThingC. This is because there are no guarantees on the fields being there if the template was used in a different location
-
Indices must be within the range of the length, otherwise the length will be the max index + 5. In the example below, the max length of the list would be implicitly set to 7 such as:
- name: inner valid_values: - indices: 0: ITDA1 1: ITDB1 -
Indices start at 0 not 1. such as:
- name: inner valid_values: - indices: 0: ITDA1 1: ITDB1 -
In the case that a length is given but no anyOf is provided it will use derived types. In the case belowthe list will always have atleast 3 elements. This will choose randomly between InnerThingDerivedA InnerThingDerivedB types or any other derived types available.
   - name: inner
     valid_values:
       - list_length:
         min: 3
         max: 4
Field Constraint Functions
Constraints are backed by the exprtk library, but the available functions are copied here from Section 1 for reference:
> [SECTION 01 - CAPABILITIES]
> The  ExprTk expression  evaluator supports  the following  fundamental
> arithmetic operations, functions and processes:
>
>  (00) Types:           Scalar, Vector, String
>
>  (01) Basic operators: +, -, \*, /, %, ^
>
>  (02) Assignment:      :=, +=, -=, \*=, /=, %=
>
>  (03) Equalities &
>       Inequalities:    =, ==, <>, !=, <, <=, >, >=
>
>  (04) Logic operators: and, mand, mor, nand, nor, not, or, shl, shr,
>                        xnor, xor, true, false
>
>  (05) Functions:       abs, avg, ceil, clamp, equal, erf, erfc,  exp,
>                        expm1, floor, frac,  log, log10, log1p,  log2,
>                        logn, max,  min, mul,  ncdf,  not_equal, root,
>                        round, roundn, sgn, sqrt, sum, swap, trunc
>
>  (06) Trigonometry:    acos, acosh, asin, asinh, atan, atanh,  atan2,
>                        cos,  cosh, cot,  csc, sec,  sin, sinc,  sinh,
>                        tan, tanh, hypot, rad2deg, deg2grad,  deg2rad,
>                        grad2deg
>
>  (07) Control
>       structures:      if-then-else, ternary conditional, switch-case,
>                        return-statement
>
>  (08) Loop statements: while, for, repeat-until, break, continue
>
>  (09) String
>       processing:      in, like, ilike, concatenation
>
>  (10) Optimisations:   constant-folding, simple strength reduction and
>                        dead code elimination
>
>  (11) Calculus:        numerical integration and differentiation
Starting Tests
When you start a test, Tangram Pro will iterate through all message sequences the component should be able to handle, analysing whether or not the component behaves as expected. Tangram Pro will listen when the component should be sending a message, and will generate a message per the sequence criteria when the component expects to receive a message from the system.
Setup New Test
Each time you start a test you have the option of changing the setup. Your previous setup is remembered so you don't have to set it everytime.
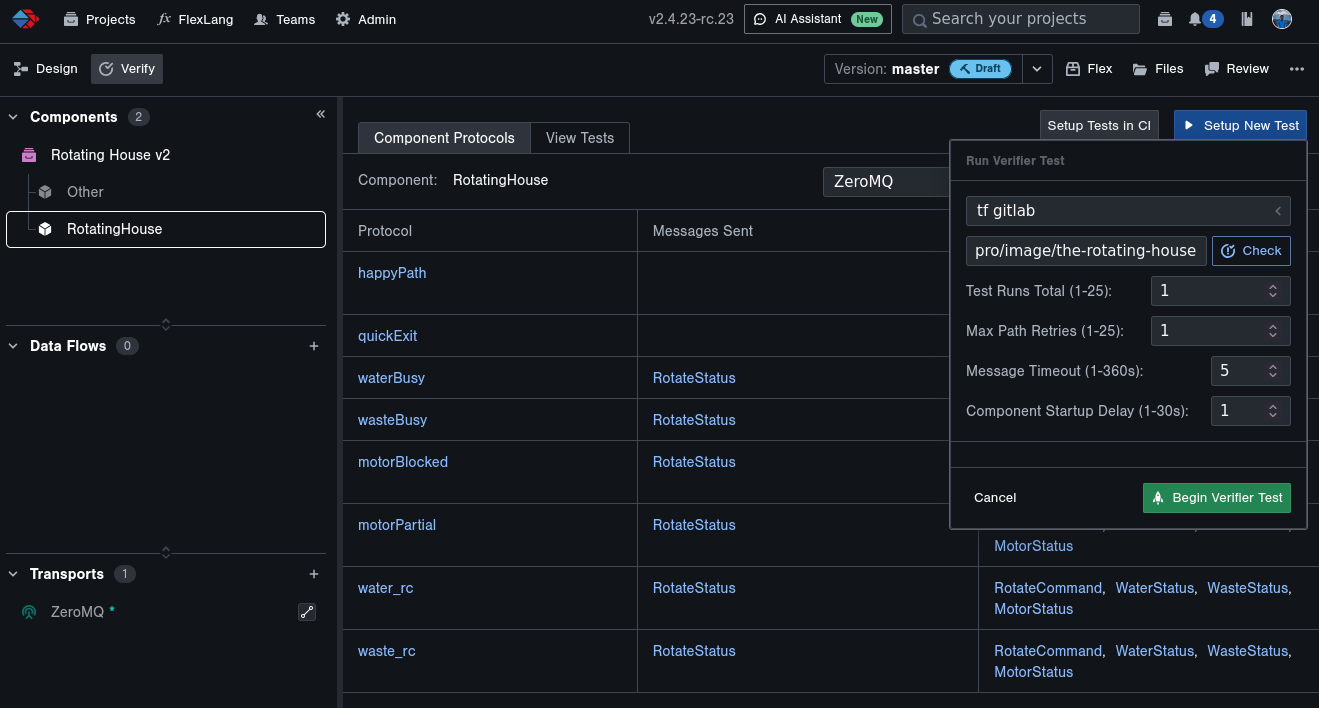
To start a test
- Click the Setup New Test button
- Specify the container image that contains your component software
- Choose Use Project Build to use an image generated by a Tangram Pro build
- Choose Use Container Registry to use an image in a registry
- Select a registry you've authorized
- Type in the path to the image
- Enter Test Runs Total: The number of times you want to test your sequences (e.g. 2 means your sequences will be tested twice)
- Enter Max Path Retries: The number of retries to attempt if a sequence is unsatisfied (e.g. 5 means a sequence path will be attempted up to 5 times until it is satisfied. If it is satisified on the 2nd attempt it will not retry again.)
- Enter Message Timeout: The time in milliseconds to wait for the next expected message in the sequence
- Choose sequences to Skip by disabling them
- Click Begin Verifier Test
Tangram Pro will run the component in isolation, with the test environment emulating the rest of the system, to test the component's interface and see how the it reacts to its environment.
Rerun Test
You can rerun any completed test with the click of a button. This will execute the test again with the same setup and input parameters.
- Go to View Tests
- Open a completed test
- Click the Run Test Again button in the top right
View Tests
When a test is running, Tangram Pro provides live reporting as it processes and analyzes each sequence, including the contents of the messages being sent. When complete, the test summary is saved for you to view all of those details later.
How to read the results
Tangram Pro reports a sequence as "Satisfied" if both of these conditions are met:
- The messages were sent and received in the order specified by sequences
- The message contents met all specified constraints
A sequence will be "Unsatisfied" if either of the above conditions are not met. It is important to note, a sequence may be "Unsatisfied" if the wait time between subsequent messages exceeds the "Message Timeout" and if the number of retries reaches the "Max Path Retries".
Tangram Pro also provides two real-time log streams.
- Component Logs: These are the logs output by your software component
- Debug Logs: These are the logs output by Tangram Pro's test environment
In the event that a test results in "Error", the logs may be helpful in determining the cause.
To view previous tests
- Go to View Tests
- Click on a test to view its results in more detail
Export Test Results
Completed test results can be exported in either PDF, DOCX, or JSON format.
To export test results
- Go to View Tests and open a completed test
- Click the Export Results button on the top right
- Wait for the process to complete (this may take a few seconds)
- Then click the Download Results button and choose the desired format