Verifier in CI
Verifier in CI lets you control where and when integration tests run against your containerized software. For information on what Verifier is and general how-to advice, visit the Verifier documentation.
Verifier in CI allows you to take a containerized version of the Verifier testing tool and run it in your own environment, such as in GitLab CI. Today, Tangram Pro supports exporting an example GitLab CI file which can be integrated into your existing repository's CI file. You are welcome to use Verifier in CI in other places, with the understanding that we currently don't have formal support for it in Tangram Pro. Reach out to us through the support links at the bottom of the page if you have questions or need assistance with Verifier.
To use Verifier in CI, you'll need to have the Verifier role applied to your user account.
What You'll Need
To run Verifier in CI, you'll need each of the following:
- Access to Tangram Pro
- For configuring your component, message sequences, and transport
- For obtaining config files via the API (optional)
- Your containerized component including the modified
watcherscript - The appropriate transport proxy for communication with your component
- This will need to be containerized, as it will run in GitLab CI during testing
- A GitLab CI which includes the provided partial CI file
- You'll need to have access to the CI/CD settings for the repo under test to set a variable
- Network access at CI runtime (only when using the API-based setup)
- GitLab will need to pull the Verifier image from Tangram Pro
- A valid
Verifiertoolkit license
We'll discuss each of these below.
Getting Started
Test configuration starts inside Tangram Pro: Verifier needs your input in order to understand how to talk to the component and what to test.
Tangram Pro should be used for the following:
- Configuring the transport proxy settings (such as hostname and port)
- Setting up the component's message interface
- Specifying message sequences that the component should be tested on
- Writing YAML field constraints for messages in those sequences
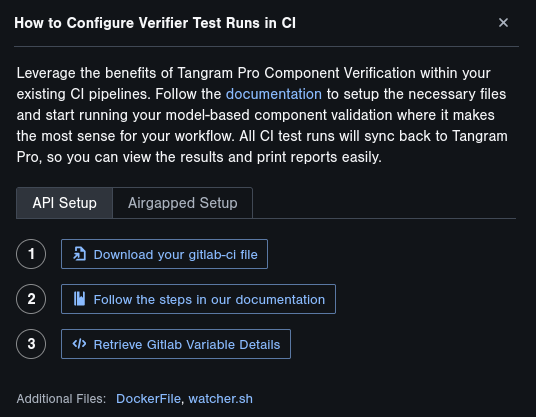
After completing component configuration in Tangram Pro, you can export a set of example files to assist in setting up Verifier tests in CI. You can find these files by clicking on the Setup Tests in CI button found in the Verify mode of Tangram Pro. The files you download and the extra configuration required for Verifier in CI depends on which setup option you choose.
The Verifier can be set up in two distinct configurations based on network architecture:
- API Setup (Same Network): When Tangram Pro and GitLab are on the same network, Verifier in CI can be configured using direct API integration for seamless communication.
- Airgapped Setup (Separate Networks): For environments where Tangram Pro and GitLab are on separate networks and cannot access each other, Verifier in CI can be configured in an airgapped setup to ensure isolated operation in secured conditions.
Whichever setup you choose, you'll need to have an active Verifier toolkit license. In the API-based setup, this license file will be pulled from Tangram Pro automatically, ensuring you'll always be able to run as long as you have a valid license. In an Airgapped setup, you will need to manually transfer the license file into the test repo in your GitLab instance as discussed later.
API Setup
By selecting the API Setup tab, you will be guided through retrieving all necessary Tangram Pro artifacts to use with an API setup.
There is no difference in the test results between an API-based setup and an Air-gapped setup. However, using the API steps will allow GitLab to automatically pull the latest configuration files for your component from Tangram Pro whenever tests run, as well as allowing test results to be pushed directly back to Tangram Pro for a better viewing experience.
GitLab CI File
Using Verifier in CI is possible in any containerized environment, but we provide an example configuration specifically for GitLab CI, which is very common in self-hosted environments. The example config will be generated for you when you open the Setup Tests in CI panel from the Verify mode in a Tangram Pro project.
This partial CI example includes:
- Pulling configuration files for your project directly from Tangram Pro via the API
- Running Verifier against your component
- Generating jUnit test results, which can be viewed within GitLab
- Pushing Verifier results to Tangram Pro, which provides a better viewing experience for test results
The partial CI example does NOT include an example image build: the ways that builds can be done here will vary depending on how your GitLab administrators have configured your instance.
You can download this partial GitLab CI file by clicking on the Setup Tests in CI button in the Verify mode of a Tangram Pro project, and
then clicking on the Download your gitlab-ci file button.
Gitlab CI/CD Variables
In the Setup Test in CI panel, you'll find a button labeled Retrieve GitLab Variable Details. Click this button to view and fetch all the required variables and view more information.
Tangram Pro Authentication
As mentioned previously, the CI example uses API calls to Tangram Pro in order to pull Verifier config files which are needed at runtime. Using these API calls allows you to modify your sequence tests in Tangram Pro and automatically use the latest tests from GitLab without needing to manually copy new files. However, these API calls do require an API key.
You'll need to create CI/CD Variables in GitLab: navigate to Settings > CI/CD in the GitLab menu, and then expand the Variables section.
You should use the Add variable button to create new variables with the following keys:
TPRO_USERNAME- You may want to deselect
Protect variableif you'd like Verifier to run in unprotected branches (by default only the default branch is protected) - Copy your username from the Setup Test in CI panel in Tangram Pro and paste it into the
valuefield for the new variable, or type it in - You should leave
Expand variable referencechecked
- You may want to deselect
TPRO_API_KEY- Generate a new token using the Setup Test in CI panel in Tangram Pro, or copy an existing token that has API permission from your user's API keys in the account settings page,
and then paste that token into the
valuefield for the new variable - You may want to deselect
Protect variable - You should leave
Expand variable referencechecked - For security reasons, you may want to consider selecting
Masked and hiddenunder the "Visibility" settings
- Generate a new token using the Setup Test in CI panel in Tangram Pro, or copy an existing token that has API permission from your user's API keys in the account settings page,
and then paste that token into the
Tangram Pro Registry Access
The Verifier image is stored in the Tangram Pro registry: you'll need to give GitLab CI access to this registry so that it can pull the image. Granting this access isn't difficult and can be done in a number of different ways, as listed in these GitLab docs. The simplest way (which requires no administrative environment changes to GitLab) is using a CI/CD variable. We'll repeat these steps here.
To give GitLab access to the Tangram Pro registry, it will need a CI/CD variable called DOCKER_AUTH_CONFIG. This variable value must be a JSON object containing an encoded copy of the
Tangram Pro username and registry token. We've added a button to make the encoding process simpler.
- From within the Setup Tests in CI modal, click on Retrieve Gitlab Variable Details
- Generate a new Tangram Pro API key, OR
- Copy an existing Tangram Pro API key and paste it into the box to the right of the
DOCKER_AUTH_CONFIGtitle
Once you have either generated a new token or copied an existing token into the DOCKER_AUTH_CONFIG field, click on the Generate Docker Auth Config button.
In GitLab, create a new CI/CD Variable. Give it a key of DOCKER_AUTH_CONFIG and paste the generated value from the Setup Tets in CI panel into the value field
of the new variable.
- You may want to deselect
Protect variable - Uncheck
Expand variable reference
Test Configuration
You may be used to Verifier options like Test Runs or Retries in Tangram Pro. When running Verifier in CI,
you can control these same parameters using environment variables that are included (along with default
values) in the generated GitLab CI file.
VERIFIER_RUNS: The number of times Verifier will test all sequences (Equivalent toTest Runs Totalin Tangram Pro)- Because Verifier will generate randomized message fields (within your applied constraints) each time it performs a run, this can be a useful way to test a component against a variety of input values in a single Verifier execution
VERIFIER_RETRIES: The number of attempts Verifier has to get each sequence to pass (Equivalent toMax Path Retriesin Tangram Pro)- This is useful when you have a component that may behave randomly in some way. Set the attempt number high enough that the sequence has a very high probability of randomly hitting the right sequence to test
VERIFIER_STARTUP_MS: The amount of time (in milliseconds) that Verifier should give your component to startVERIFIER_TIMEOUT_MS: The maximum delay time (in milliseconds) that may occur before Verifier determines that the component under test is not going to send a response
Making Sequence & Messages Set Changes
In an API-based setup, Verifier in CI uses the Tangram Pro API to automatically pull the latest Verifier configuration for your
project from Tangram Pro when running in the GitLab pipeline (which occurs in the verifier:pull_api job if you're using our generated GitLab CI file).
To change the sequences that your component gets tested against, the transport configuration, or the messages that are used in the test sequences, use Tangram Pro to modify the Flex package or sequences just as you normally would for Verifier. The next time Verifier in CI runs, it will use the latest configuration from Tangram Pro.
Airgapped Setup
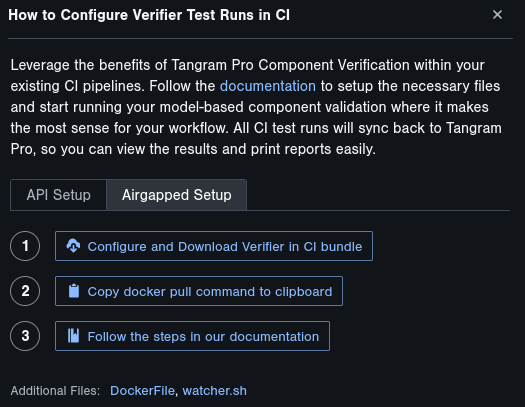
To configure Verifier in CI for an air-gapped environment, click on the Setup Tests in CI button within the Verify mode of Tangram Pro. From here, you'll be provided with buttons & documentation to download all of the required files for Verifier in CI to be operational in GitLab.
In an air-gapped environment, it is up to you to update any and all files that need to be changed. If you need to update the message sequences, you'll
need to do so manually via the model.yaml file or return to Tangram Pro and then download new files. Similarly, if your license expires you'll need to
download the new bundle file and copy the new license.zip file over to your air-gapped setup.
Required Files
When you click on the Configure and Download Verifier in CI bundle button, you'll be provided with a ZIP archive containing most of the files that you'll need to get Verifier in CI working in an air-gapped environment.
- The generated GitLab CI file (which differs slightly from the API-based CI file)
config.yaml: A configuration file telling Verifier how to run & test the component, set up for a GitLab environmentmodel.yaml: The component's model as configured through the message sequences in Tangram Pro's UIflex.json: A JSON file containing all of the required Flex message types that the component interface useslicense.zip: Your Tangram Pro license (along with required items for decrypting & verifying that license), which is required for Verifier to run
Copy all of these files into the top level of the repo where you'd like testing to occur. You may place these files in a subfolder, but you'll need to make some configuration updates so that Verifier can find them:
- Update
config.yamlto point to the correct path oflicense.zipfile - Update the
verifier testcommand arguments under theverifier:test_componentjob in the GitLab CI file to use the correct paths for the other files
Verifier's Docker Image
Verifier runs in a container, so you'll need to pull the image from Tangram Pro's registry and then push it to your air-gapped environment's registry.
- Use the provided command to download the image with
docker - Push the image to your air-gapped network
- If you have temporary network access to the air-gapped environment, you can use
docker pushto push it directly to your GitLab's registry- Rename the image with a command similar to
docker tag <Verifier image name> <your GitLab registry>/<Verifier image name> - Push it to your air-gapped environment's registry with
docker push <your GitLab registry>/<Verifier image name>
- Rename the image with a command similar to
- If you don't have any access to your air-gapped network, you'll need to save the image to a file and then load and push it from within that network
- Save the image to a file with
docker save <Verifier image name> > verifier.tar.gz - Transfer
verifier.tar.gzto your air-gapped environment via USB, CD, or other secure means as defined by your security team - Load the image from the file with
docker load -i verifier.tar.gz - Rename the image with a command similar to
docker tag <Verifier image name> <your GitLab registry>/<Verifier image name> - Push it to your air-gapped environment's registry with
docker push <your GitLab registry>/<Verifier image name>
- Save the image to a file with
- If you have temporary network access to the air-gapped environment, you can use
- Important: you will need to rename the Verifier image in the generated CI file to match its name once pushed to your GitLab registry!
Configuring Verifier in CI
Whether you're using an API-based or an air-gapped setup, the same configuration options & test results are available to you within GitLab.
Component Containerization
To use Verifier in CI, you must create a new image build job in your CI pipeline that uses the provided Dockerfile (modified to base
it off of your existing component image) to wrap your component image (and component process) with our watcher script.
The watcher.sh script is a required wrapper which allows Verifier to signal and receive signals from your component process without
requiring any code changes. Specifically, it uses file-based signaling to handle component lifecycle:
- The
startfiletellswatcher.shto start your component process - The
killfiletellswatcher.shto end your component process - The
watchfiletells Verifier if your component process ends
Managing component lifecycle allows Verifier to ensure that every sequence test is conducted on equal footing, with a fresh component state.
- Wrap your component image with the watcher script by modifying the example Dockerfile, replacing
<YOUR COMPONENT IMAGE>with the image you want to test - On the
verifier:test_componentjob of the generated GitLab CI file, replace<YOUR IMAGE CONTAINING COMPONENT AND WATCHER SCRIPT>) with your wrapped component image- Refer to the GitLab documentation for more information about setting up services if you need to pass
environment variables to your component, set an
aliashostname to connect to the component, or provide other details.
- Refer to the GitLab documentation for more information about setting up services if you need to pass
environment variables to your component, set an
Watcher Script
The watcher script is sh and bash compatible (at least). You may make it execute with bash (or another shell) if you wish, if you need extra functionality not provided by sh. The core function of this script is to allow Verifier to manage the lifecycle of your component through three files:
/builds/startfile: Allows Verifier to start the component process/builds/watchfile: Watches and notifies Verifier if the component dies/builds/killfile: Allows Verifier to forcefully stop the component process
The watcher.sh script WILL require a modification for it to work: specifically, you'll need to modify the
run_on_start function to start your component process, and the wait_for_kill function to kill your component process.
Without these changes, the script will not work as expected.
You can find this file below.
Example 1:
Perhaps your component is Java-based. In run_on_start you might replace <YOUR PROCESS EXECUTABLE> with java -jar component.jar. You would then need to modify wait_for_kill to kill that process, for example using pkill java.
Example 2:
Your component may be a binary that you run with /home/user/component --config ./config.yaml. You would replace <YOUR PROCESS EXECUTABLE> in the run_on_start function with that startup command, and you could then run pkill component in wait_for_kill to kill the component process.
If you would like to find another way to manage the component lifecycle that fits this interface, you're welcome to replace
watcher.sh with your own implementation.
Transport Network
You can learn more about the available settings for each transport type in the reference documentation.
GitLab supports running Services on jobs, which can be used to run any transport proxies your component may need (such as Kafka, ActiveMQ, NATS, etc.).
This transport proxy should be added as a service to the verifier:test_component job, filling in the options highlighted for you:
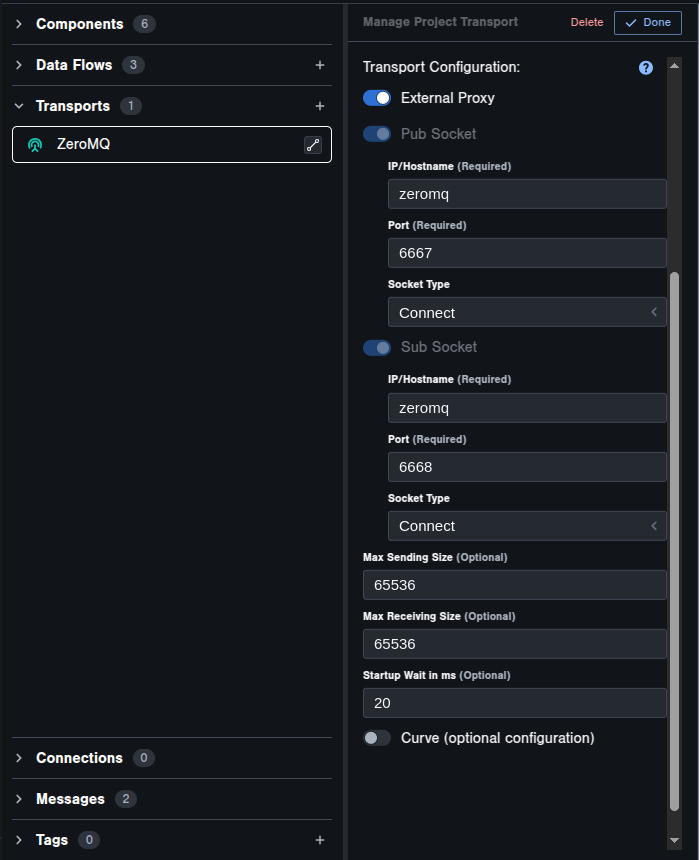
<YOUR TRANSPORT PROXY>: This could be an ActiveMQ, Kafka, or MQTT broker, or any of the other proxies supported by Verifier<YOUR TRANSPORT HOSTNAME>: This should be whatever hostname your component expects to reach the proxy at, and you should copy this into theIP/Hostnamesetting for the transport in Tangram Pro's transport configuration
Verifier needs to know how to talk to your proxy: ensure that you set the transports IP/hostname on the job service using the alias attribute and match this value on the transport IP/hostname
setting when configuring your transport in Tangram Pro.
Verifier (and Verifier in CI) need to connect to your component through a known method in order to send and receive messages while testing message sequences. You can configure
these transport settings using the Transport panel in your Tangram Pro project's Design mode.
Viewing Results
Results are available in three ways:
- View the
results.jsonfile produced by theverifier:test_componentjob- This contains all data, but is not particularly suited to human viewing
- View the triggered pipeline Test tab as discussed earlier
- View the results directly in Tangram Pro (available when using the API-based setup)
- We recommend viewing the results in Tangram Pro, which can be found in the Verify panel of the project you configured the Verifier in CI test from. See more about interpreting results here.
jUnit Test Results
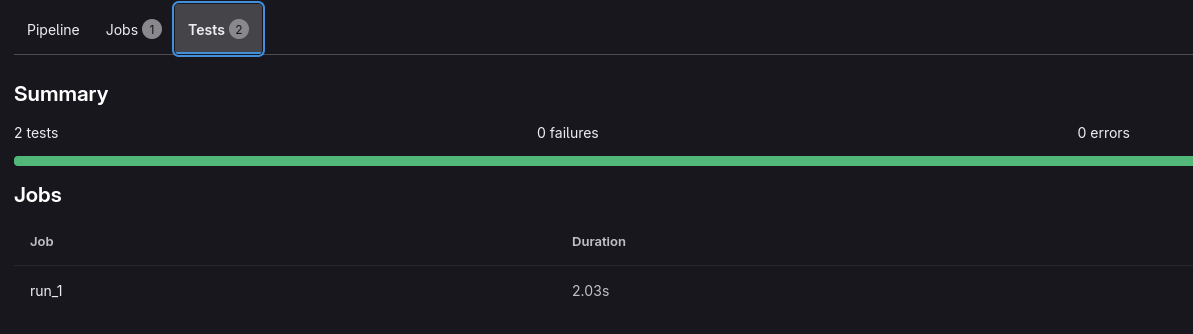
The provided CI will trigger another pipeline, which parses the Verifier results and then displays them in a Test tab. To view these results:
- Once the Verifier jobs have completed, view them in the Pipeline panel of GitLab
- Find the
verifier:trigger_junit_resultsdownstream pipeline job, and click on the blue pipeline link
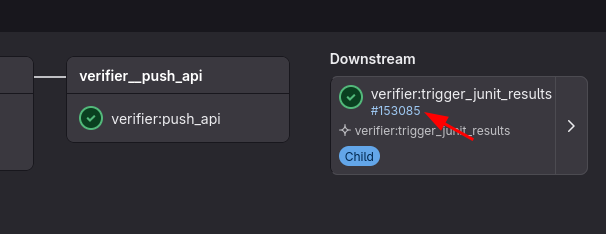
- On the triggered pipeline, click on the
Testpanel to see results- Results will be separated by run: if you've configured multiple
rerunsin the Tangram Pro test configuration, each run will appear here - Inside each run, pass/fail results will be shown for each sequence. Viewing details for a failed test will show details about why the component failed the test
- Results will be separated by run: if you've configured multiple
Example files
Example Dockerfile
See above for details on this file.
Dockerfile
# The image will be based off of your own component image
FROM <YOUR COMPONENT IMAGE>

# This watcher script will handle the execution & lifecycle of your component process
COPY --link ./watcher.sh /watcher.sh
RUN chmod +x /watcher.sh

ENTRYPOINT ["/bin/sh", "/watcher.sh"]
Example Watcher Script
See above for details on this file.
watcher.sh
#!/usr/bin/env sh

STARTFILE=/builds/startfile
WATCHFILE=/builds/watchfile
KILLFILE=/builds/killfile

LOGFILE=/builds/component.log


run_on_start() {
    # Modify this line to run your component process
    <YOUR PROCESS EXECUTABLE> 2>&1 | tee -a $LOGFILE
    echo "Component exited" | tee -a $LOGFILE
    echo "done" > $WATCHFILE

    # kill this shell fork
    exit 0
}

wait_for_start() {
    echo "=============================" >> $LOGFILE
    echo "Waiting for start..." | tee -a $LOGFILE
    while [ ! -s "$STARTFILE" ]; do sleep 1; done
    echo "Received start" | tee -a $LOGFILE

    # Clear the start signal file
    echo -n > $STARTFILE
}

wait_for_kill() {
    echo "Waiting for kill signal..." | tee -a $LOGFILE
    while [ ! -s "$KILLFILE" ] && [ ! -s "$WATCHFILE" ]; do sleep 0.1; done
    if [ -s "$KILLFILE" ]; then
        echo "Received kill signal" | tee -a $LOGFILE
        pkill <YOUR PROCESS EXECUTABLE>
    fi

    echo -n > $KILLFILE
    echo -n > $WATCHFILE
}


# Create & clear signal files to start
echo -n > $STARTFILE
echo -n > $WATCHFILE
echo -n > $KILLFILE

chmod 777 $STARTFILE
chmod 777 $WATCHFILE
chmod 777 $KILLFILE


while true; do
    echo "Starting loop..." | tee -a $LOGFILE

    wait_for_start
    run_on_start &
    wait_for_kill

    echo "Exiting loop" | tee -a $LOGFILE
done
Troubleshooting
My pull_api CI step is failing
The most likely cause of this is invalid credentials in the CI/CD variables.
You're most likely seeing something that looks like:
Failed to pull image ...: 401 Unauthorized
If this is the case, your DOCKER_AUTH_CONFIG variable is incorrect. Try regenerating it.
My pull_api CI step completed successfully, but Verifier can't find config files
There are two issues which may occur here most frequently:
- GitLab was slow and didn't properly feed job artifacts through; simply try rerunning the Verifier step using the circular "Run again" button
- The API call to Tangram Pro is using invalid values
- This can occur when your component transport was deleted and recreated, when the component is moved to a new owner, or for a variety of other reasons. Try regenerating the GitLab CI file and copying the new
variablesover your existing CI file's variables
- This can occur when your component transport was deleted and recreated, when the component is moved to a new owner, or for a variety of other reasons. Try regenerating the GitLab CI file and copying the new
You can also try browsing the job artifacts in the completed pull_api step and ensuring that the files don't contain null and have
valid data inside. If they do just contain null, try regenerating your GitLab CI/CD variables.
My test_component step completed successfully, but the jUnit jobs are failing
This comes back to slow GitLab artifacts again. Try rerunning the jUnit step.