Design
The Design mode of a project is where you layout and define your component-based system. The sidebar on the left displays a list/tree of your components and connection details. The stage on the right is where you interact with components and other objects to model your system.
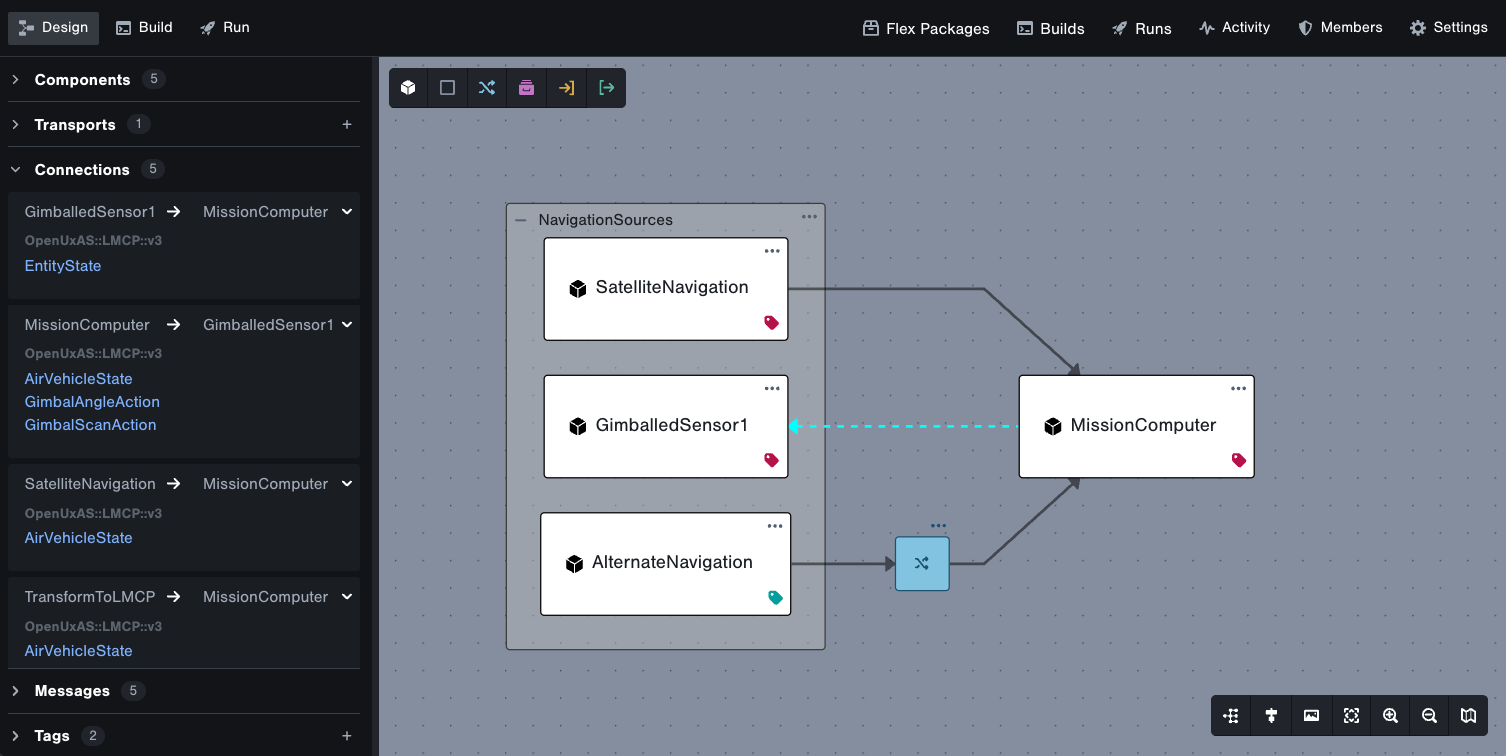
Changes you make to the design are saved automatically.
Components
Components are the main building blocks of a Tangram Pro design. They represent pieces of software, each with their own interface specifications. After a component is added to the design, you'll be able to define which messages it sends and receives, and connect it to other design objects.
Add
Click the Add Component button in the design toolbar, and then click anywhere on the stage.
The design layout automatically changes as components are added.
Rename
Double-click on a component's name to rename it.
The name must contain alphanumeric characters and underscores only.
Messages
Click the ... button in a component, and select Messages to open the component's interface panel. Here you can choose the Flex Package, and the Messages that will be input or output from the component.
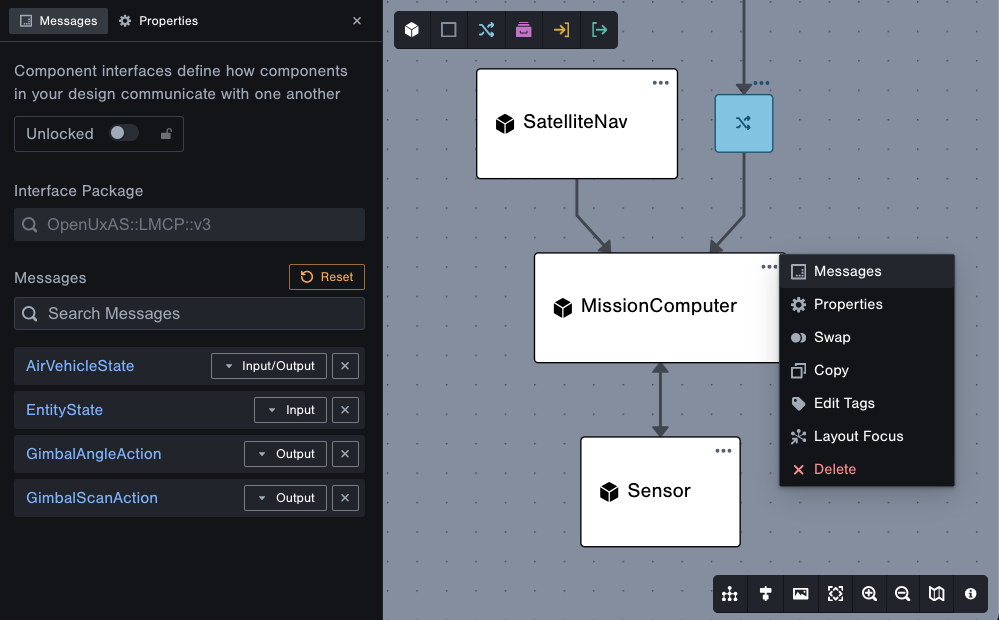
Interface Package
The Interface Package determines which set of messages can be applied to a component. The packages shown in the dropdown menu originate from the FlexLang area. There are many built-in packages, and you can also add your own or fork existing ones. For more information see Built-in Message Sets and Flex Package Management.
Messages
One or more messages from the selected package can be applied to a component. For each message, you can set the direction to be Input, Output, or Input/Output.
Lock Interface
You can prevent changes to a component's interface specification by locking it. Edit the component's Messages, and toggle the Unlocked/Locked button.
Properties
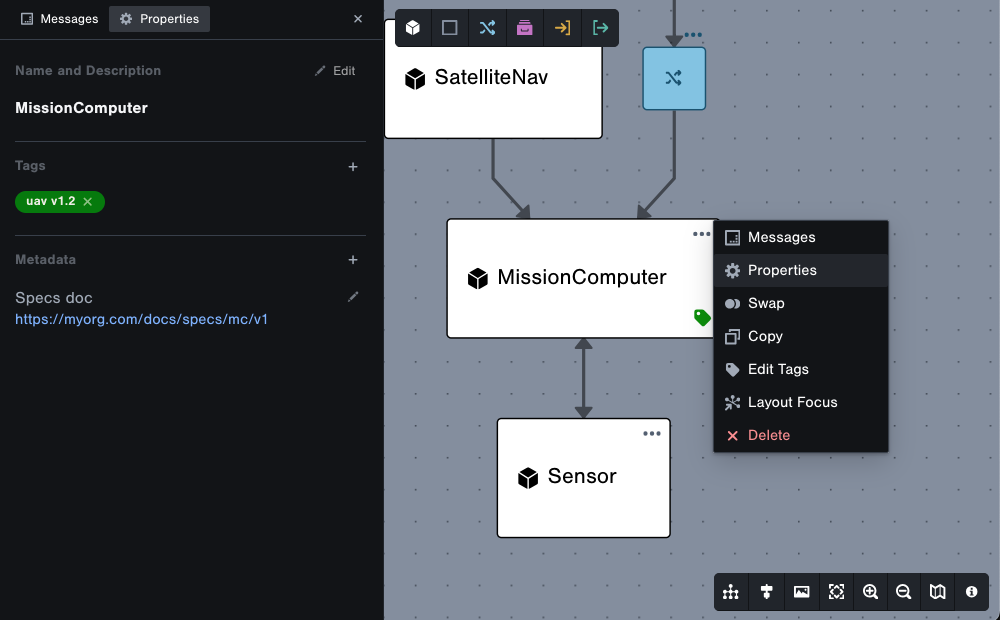
You can add a description and metadata to a component by clicking its ... button, selecting Properties.
Edit Tags
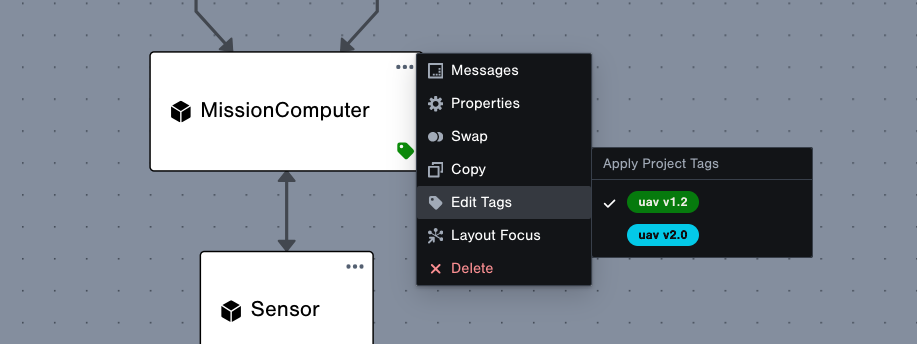
You can apply tags to a component by clicking the ... button and selecting Edit Tags. For more details see Tags
Copy
You can create a copy of a component by clicking the ... button, and selecting Copy.
This will create a duplicate of the component and its interface settings. Connections are not copied.
Swap
You can swap a component for a project by clicking the ... button, and selecting Swap.
This will replace the component in your design with another project. If you swap for a project that has a different interface, any connections to/from the project will be highlighted and indicate which messages are incompatible. You can resolve this by removing the incompatible messages from the connection, or by opening the project and adding the incompatible messages to its interface.
You can also swap a project in your design for another project. For more information about using projects as components see Add Sub-Project.
Delete
Components can be deleted at any time by pressing the delete key or by clicking the ... button and selecting Delete.
This will remove the component from the project, and remove its associated connections. A warning dialog will display to confirm deletion.
Connections
Connecting components allows you to define which messages are sent and received between them, and which transport they communicate over.
Add
To add a connection between two components, draw a connection by clicking and dragging from the edge of a component to another component.
A dashed line arrow indicates that no interface is defined for the connection.
Edit
Click on a connection arrow to edit which messages are being sent across it. Click into the Search Messages box and select 1 or more messages to add them to the connection.
When the components don't have an interface defined yet:
You can select any interface package and messages for the connection, and the components' interface will be updated to match it.
When the components do have an interface defined:
The interface package for the connection will be preselected, and you can choose which messages to include in the connection. Click the Suggested button to quickly choose messages already defined in the components.
A connection can't be made directly between components that have different interface packages applied to them. You'll need to use a transform for that situation.
Bidirectional
A connection is added in one-direction by default. You can specify the other direction by clicking the Switch Directions button.
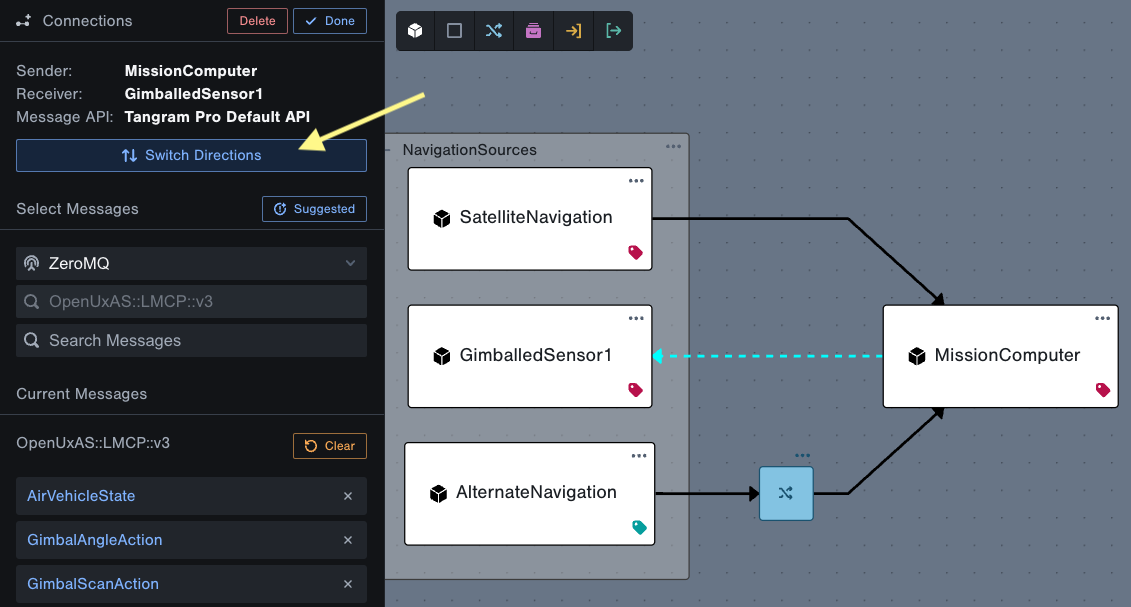
Overview
You can see details for all connections in your design by expanding the Connections section in the sidebar. Hover over a connection in the list to highlight it in the design.

Delete
Connections can be deleted at any time by selecting them pressing the Delete key.
Deleting a connection will not change the components' interface settings.
Transports
A Transport is a property of a connection in Tangram Pro that designates which message delivery service to communicate over. As you design a system and connect components and transforms together, you can choose which transport to use for each connection. All connections in your design can use the same transport (e.g. ZeroMQ), or for more complex systems, you can assign different transports to different connections.
Add
Add a transport to your design from the Transports section in the left sidebar. You can add multiple transports and rename them if needed.
The first transport that you add is set as the default.
Delete
Transports can be deleted at any time by selecting it in the Navigator and clicking Delete. Any connections referencing the deleted transport may need to be updated.
Default
The default transport is shown in the Navigator with an asterisk * beside it. All new connections will default to this transport. You can change the default by selecting another transport in the Navigator and clicking Use as default Transport.
Transforms
You can connect components that use different interface packages with a transform. Transforms allow you to connect components that do not share a common message. They do the job of converting message A to message B.
A Flex Package must exist and contain a Transform definition for the two different messages you wish to connect.
Add
To connect with a transform:
- First you'll need two objects in the design (Components, Projects, Inputs or Outputs)
- Click the Add Transform button in the design toolbar, and click anywhere to add it
- Select the sender and receiver components
- Choose the input and output Messages
- Choose the input and output Serializers
- Optionally, choose which Transports to use
- Click Apply Transform for the desired Transform
All of the transforms that satisfy the conversion between your messages will be shown with the transform's name, package name and file name to help you differentiate between the options.
Delete
A transform can be deleted anytime by selecting it and pressing the Delete key.
Groups
You can organize components and their connections within a project using groups.
Add
Click the Add Group button in the design toolbar, and then click anywhere on the stage.
Drag and drop components into the group. You can also add groups inside of groups.
Rename
Double-click on a group's name to rename it.
The name must contain alphanumeric characters and underscores only.
Expand/Collapse
Collapse a group by clicking the – icon in the top left, and expand by clicking the + icon.
Copy
You can create a copy of a group by clicking the ... button and selecting Copy.
This will duplicate everything inside of the group including all of its connections.
Convert to Project
You can turn a group into a separate project by clicking the ... button and selecting Convert to Project. The newly created project replaces your group as a sub-project.
This will create a project that includes all the components and connections that were inside the group. It will also define inputs and outputs for the project based on what messages were input and output from the group.
Delete
Deleting a group will delete everything contained inside it.
Sub-projects
Add Sub-Project
Projects can be added to your design as sub-projects by clicking the Add Project button. They represent subsystems in your design. They look and act similar to components, except that they must have an Input object and Output object defined within them in order to connect to other objects.
Delete Sub-Project
Sub-projects can be deleted like any other component by pressing the delete key or by clicking the ... button and selecting Delete. A warning dialog will display to confirm deletion, which will remove the component from the project and its associated connections.
Define Inputs and Outputs
Input and output specifications can be defined and act like an interface for your project. Inputs are the messages that the project requires, and outputs are the messages that the project provides. A project with defined inputs and outputs can be used like a component in other projects. As your project library grows, the more interchangeable parts you'll have at your disposal.
To add them, use the Add Input and Add Output buttons in the toolbar. Connect the input or output object to a component and select the desired messages.
Tags
You can organize elements in your design with tags.
Add
You can add a tag from the sidebar by clicking the + button next to Tags. Enter a label and choose a color for the tag.
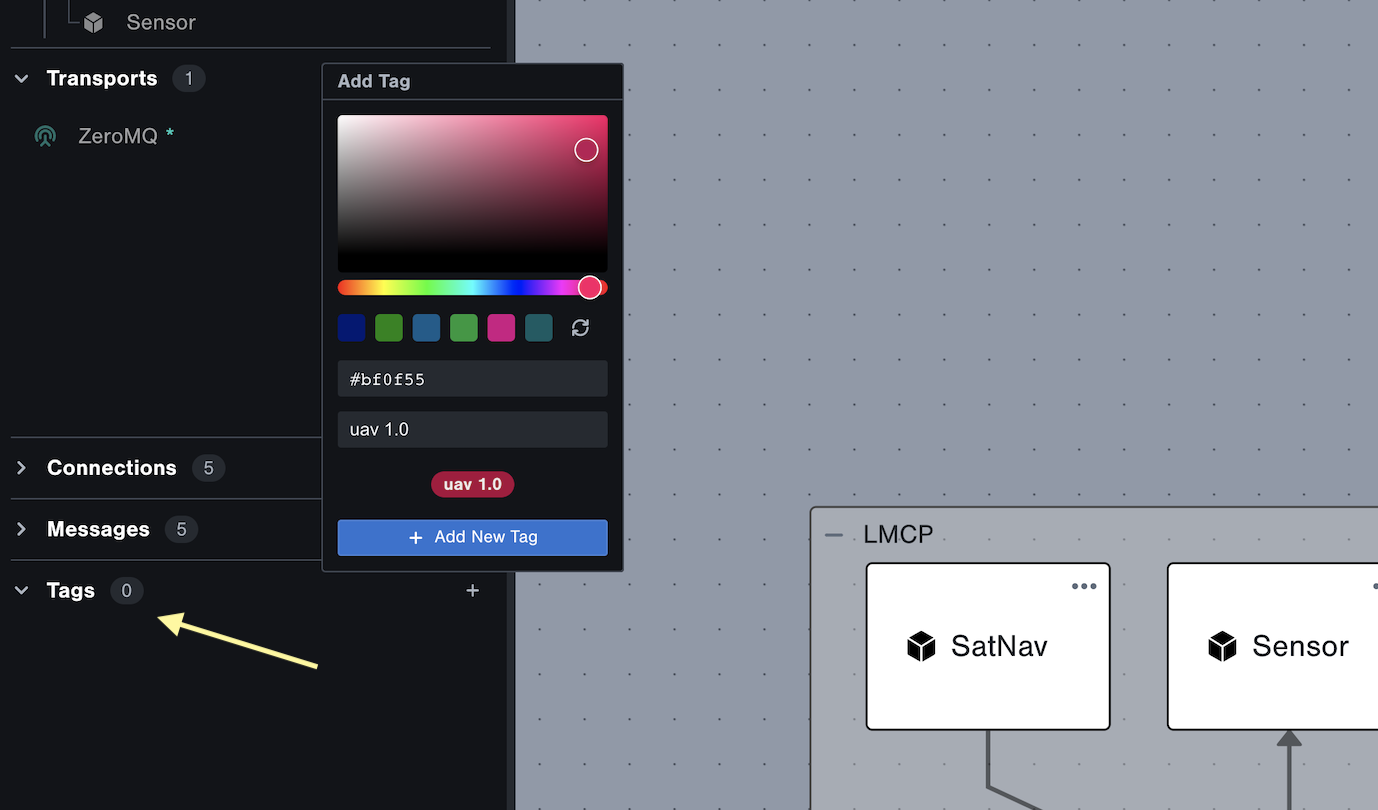
Apply
Tags can be applied to components, groups, and transforms in the design by clicking the ... button and selecting Edit Tags
Filter View
You can filter the design view based on tags:
- Hover over a tag in the list to highlight the tagged components in the design
- Click the eye icon next to a tag to filter the design to only the tagged components
Export your Design
Export as PNG or PDF
You can save a snapshot of your design by clicking the Export button in the view toolbar on the bottom right. Select either PNG or PDF.
Export as JSON
You can export your project design as JSON files by going to Settings. Exported projects can be imported by going to Projects > New Project and clicking Import Project from JSON.