Build
The Build mode of a project is where you turn your system design into code. Ready-to-run interface code is generated based on the components and connections included in your design. You'll be provided with source code that can be used as an API to integrate different pieces of software.
Downloadable artifacts are generated when a build is complete. The generated code will include message definitions (based on what you selected in your design), API libraries and built-in tests. You can also choose to have Tangram Pro™ compile the generated code and incorporate it into a container image, according to your Dockerfile, for use later on when testing your design and generated code in Run or Verify mode.
Configuring a Build
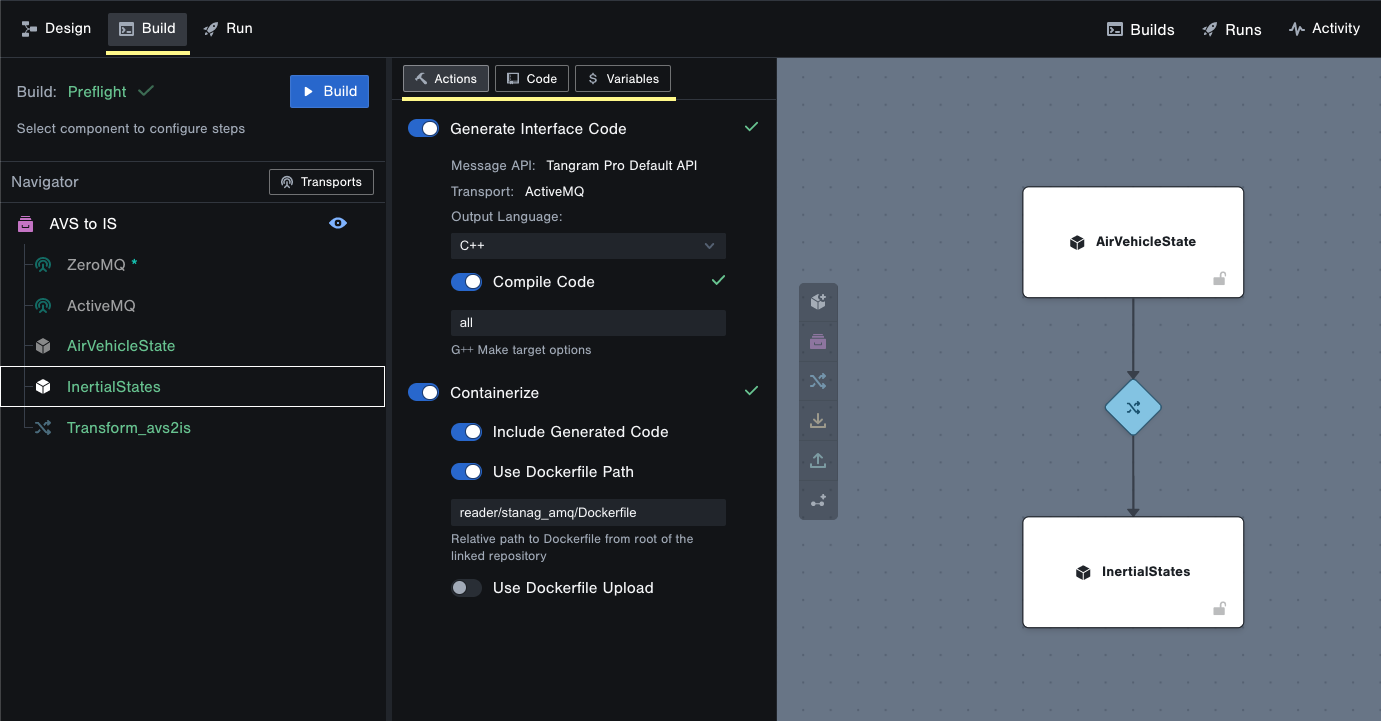
Click on Build in the top left to start configuration. Your design will still be visible, but in a read-only mode. Every Component and Transform in a project has build options that can be configured separately, so you can choose to generate code and containerize the entire system or a subset.
Build configuration tabs:
- Actions: Select code generation and containerize options
- Code: Link a source code repository
- Variables: View and define container environment variables
Supported Languages
Tangram Pro™ supports the following output languages:
- C++
- MISRA-C
- WOSA-C
- Rust
Generate Interface Code
Each component and subcomponent can have interface code generated for it that you can download as well as run in a container.
To generate interface code:
- Select a Component on the left
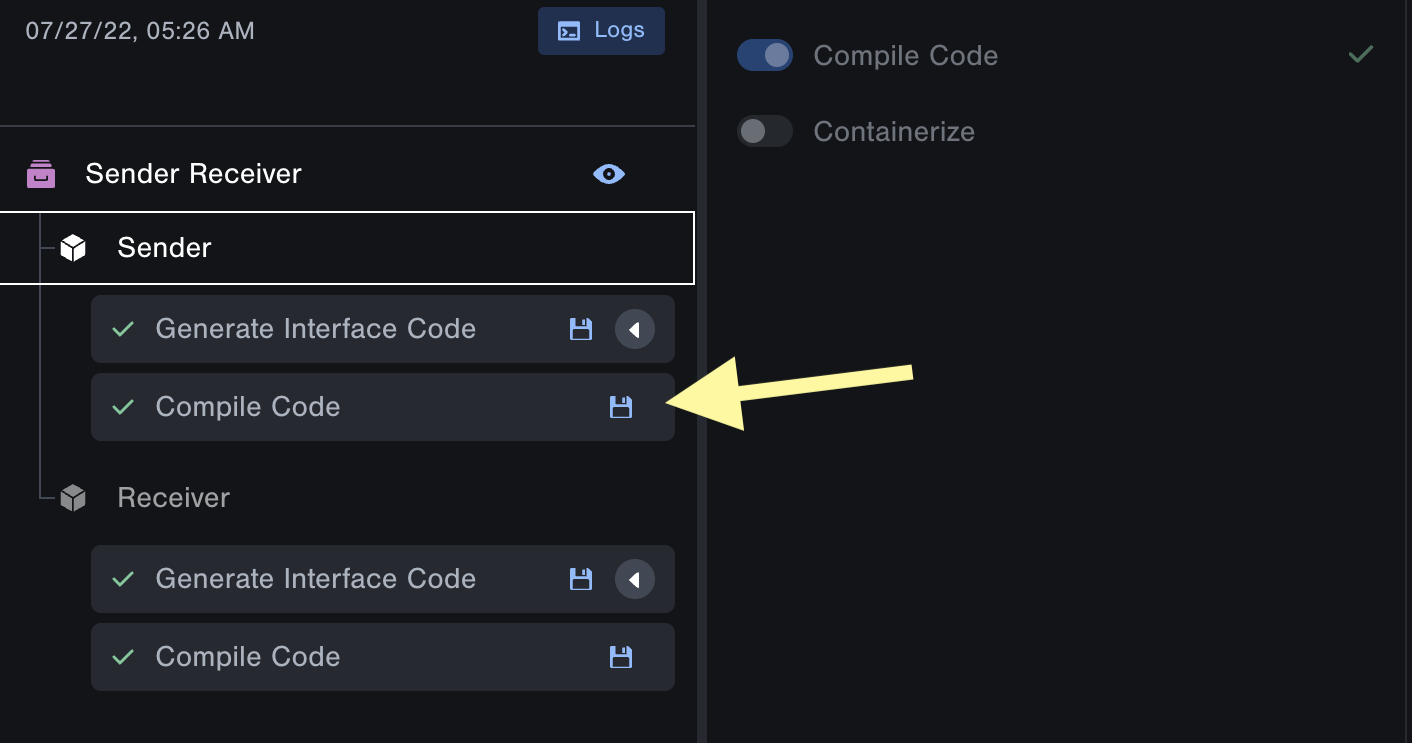
- Enable Generate Interface Code and select the desired output language
C++,Rust,MISRA-C, orWOSA-C - Choose a Flex Message API – Choose OMS if working with an OMS package, otherwise keep the default selected.
The Flex Message API determines the format of code generated by Tangram Pro. The "Tangram Pro Default API" option suits most scenarios.
-
Enable Compile Code if desired. This will result in fully built code, saving you the work of compiling it locally on your machine.
For
C++,MISRA-C, andWOSA-C: Enter any make target options (all is the default)For
Rust: Select a target platform architecture from the dropdown -
Repeat for each component you wish to generate code for
Generate Transform Code
You can generate transform code for each transform in your system, which you can download as well as run in a container.
There are different types of code generation available for transforms. All output C++ artifacts:
| Build Option | Description |
|---|---|
| Generate Transform Code | Outputs the transpiled transform function |
| Generate Transform Code with CSIs | Outputs an executable transform application built with CSIs and CSI Adapters. You can also generate and upload Contextual Parameter Provider Class files before the app is generated |
To Generate Transform Code
- Select a Transform on the left
- Choose Generate Transform Code
- Choose a Flex Message API for the input and output
Keep the default selected or choose OMS 1.6, OMS 2.0, OMS 2.1, DDS, or Protobuf
To Generate Transform with CSIs
- Select a Transform on the left
- Choose Generate Transform with CSIs
- Configure the Transform Input
- CSI – Choose one of your uploaded CSIs, or "Tangram Generated" to have Tangram Pro generate it
- Adapter – Choose one of your uploaded CSI Adapters, or one of the built-in options.
tip- Adapters can only be applied if they support the Transform's Transports and Serializers. These properties can be changed in Design mode.
- If you're not sure which adapter to apply, try the
OpenUxAS LMCP v3 (Tangram)adapter
- Repeat for the Transform Output
- Optionally, generate and update a Provider Class file for Contextual Parameters (see below)
You can upload your own CSIs and CSI Adapters in CSI Resources. To inquire about creating your own CSIs and Adapters, please contact us at support@tangramflex.com.
To Upload Contextual Parameter Provider Class Files
If the Transform uses Contextual Parameters, you have the option to download and modify the Contextual Parameter's Provider Class file to implement within your system. This allows you to build the transform application with your updated Provider Class, and run it in a container. Otherwise, the Provider Class can be updated locally after the transform app is generated.
- Click the Generate Provider Class Files button and wait for it to generate
- Once complete, click the Download Artifact button. Open the downloaded
tar.gz. Inside you will find a.hppProvider Class file which includes a public class with aparam. - Edit the
.hppProvider Class file and populateparamas needed - Once updated, click the Upload file button beside the name of the contextual parameter and upload the
.hppfile - When you run the Build, the transform application will include your updated Provider Class file
Containerize
You can create a container image for each component and transform by enabling Containerize. This will allow you to verify your component interfaces and transforms in containers without needing to download the code or install virtual machines. When a containerized build is completed, use the Run or Verify feature to spin up all the containers and view their logs all within Tangram Pro. We'll also provide a downloadable docker-compose.yml file that you can use to run the containers from your machine as needed.
To containerize:
- Select a Component or Transform in the Navigator
- Enable Containerize
- Select Include Generated Code to include your generated interface code
- Provide a Dockerfile that contains all the commands needed to assemble an image. There are 3 ways to provide a Dockerfile:
When you enable containerize for a transform, a default Dockerfile will be provided. You can remove it and provide your own if needed.
Provide Dockerfile via upload
- Toggle Use Local Dockerfile
- Click the Upload Dockerfile button
- Select a Dockerfile on your machine and click Open
Create a Dockerfile in Tangram Pro
- Toggle Use Local Dockerfile
- Select Edit Dockerfile
- Type or paste your commands for the dockerfile
Provide Dockerfile via repository
- Toggle Use Dockerfile Path (This option requires a linked repository. See Link a Code Repository)
- Enter the path to the Dockerfile from the root of your repository. For example, if your Dockerfile is at the root of your repository, then simply enter
Dockerfile. If it is in a directory named "writer", then enterwriter/Dockerfile.
If your container needs to be built with an image from a private registry, you can authorize your Tangram Pro account to access it. You'll need to authorize each private registry for your container before starting a build. See Container Registries
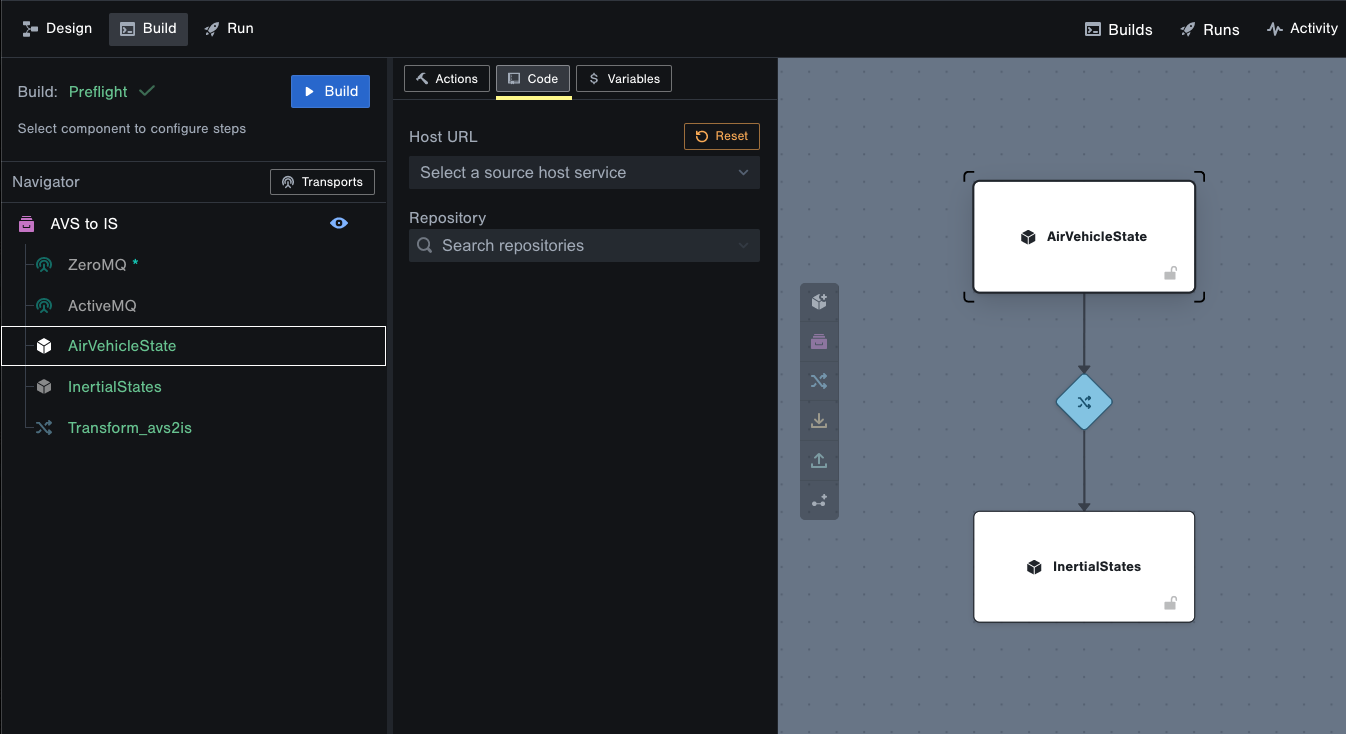
Link a Code Repository
Each Component and Transform can be linked to a repository from a GitLab or GitHub account. This allows you to pull in Dockerfiles and dependent source code into a Tangram Pro container build by providing a Dockerfile Path under the Containerize option.
You'll need at least one source code host integration before proceeding. See Source Code Integration for information on how to set up a source code host.
To link a code repository
- Select a Component or Transform in the Navigator
- Go to the Code tab
- Select a source code host
- Search for and select a repository
Click the Reset button to unlink a repository
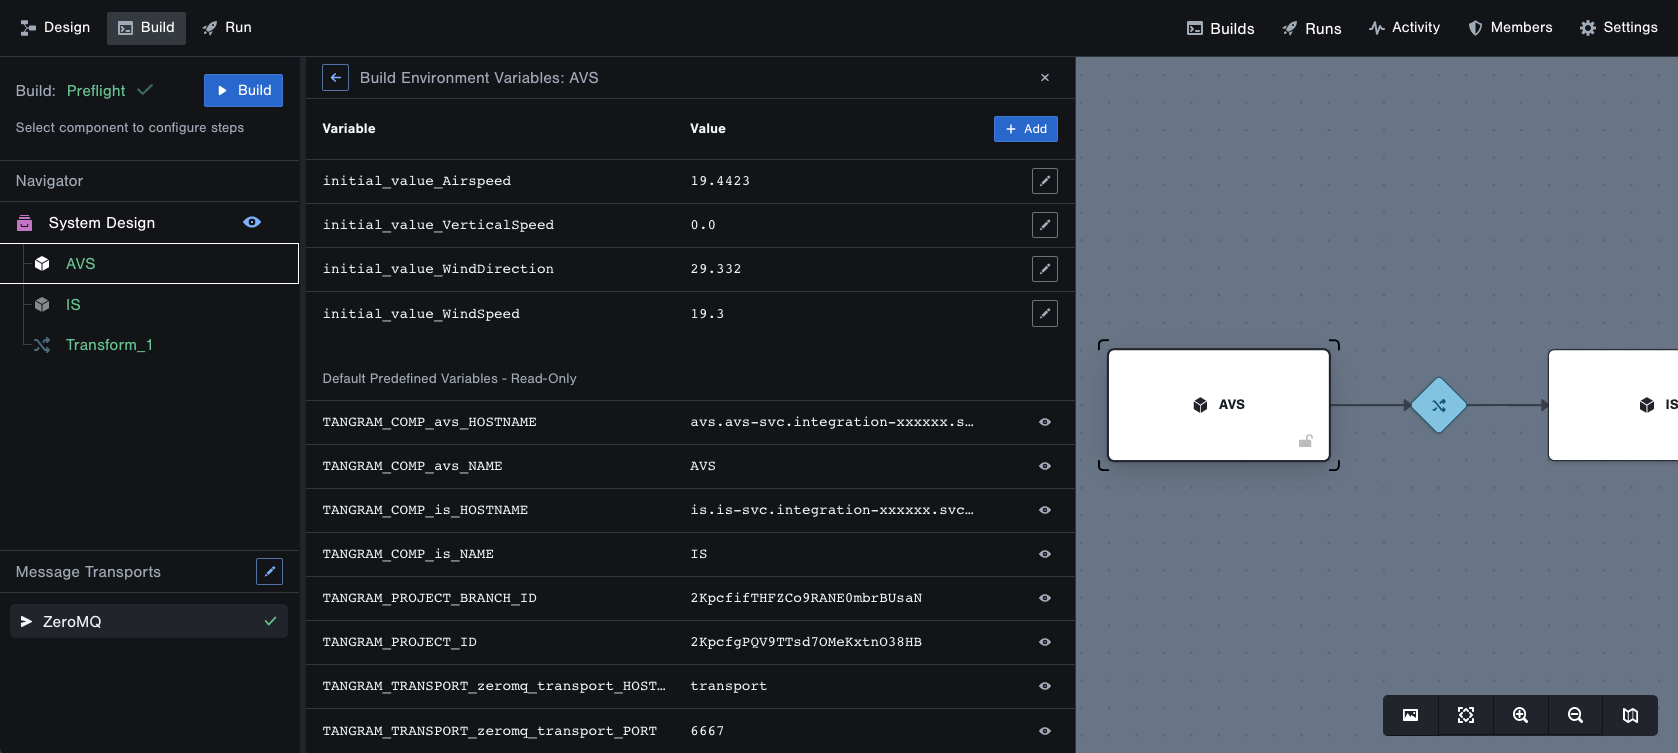
Manage Runtime Environment Variables
Containers produced from builds have context of your system design in the form of runtime environment variables. Each container has a host name variable based on the name of the component in your design (e.g. TANGRAM_COMP_avs_HOSTNAME, where "avs" is the name of the component.) Host name variables can be utilized in your applications to send data from one container to another.
You can define custom environment variables that are accessible in containers, along with the predefined variables.
If you need to update your custom environment variables after a build, be sure build again to create new containers.
To view and add environment variables
- Select the Project, a Component, or a Transform in the Navigator
- Go to the Variables tab
- Click Add to enter a custom variable name and value. Variable names can contain letters, numbers, and underscores.
Project-level environment variables are global and inherited by all components and transforms.
Start a Build
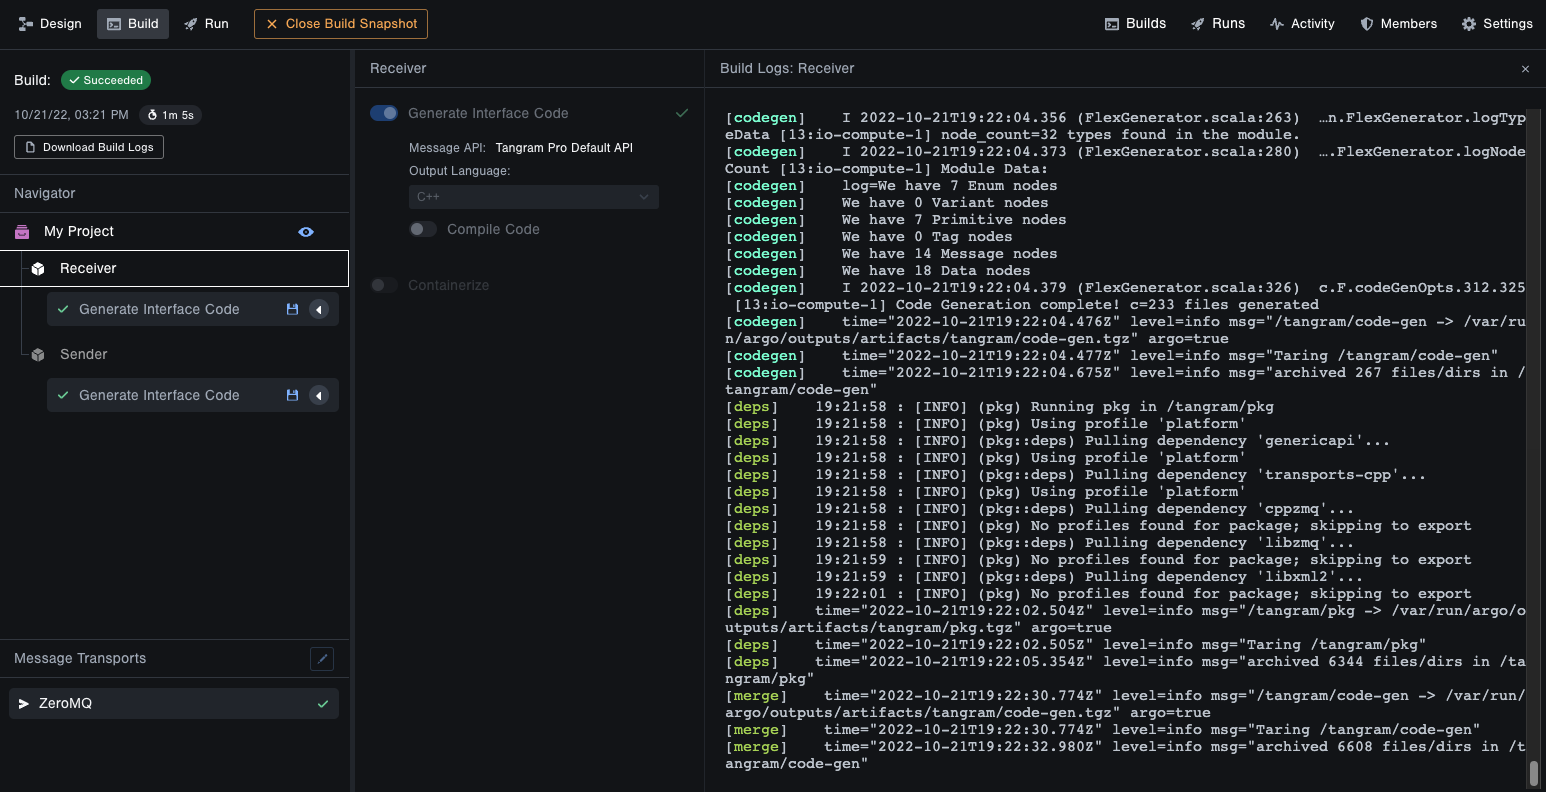
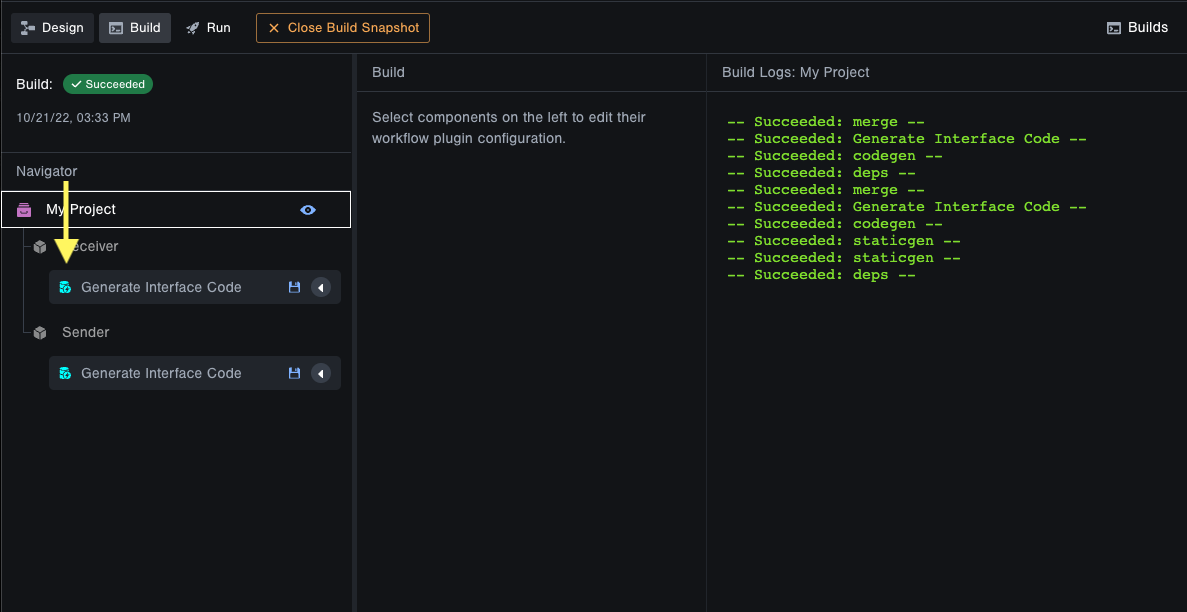
After you've configured your components, click the Build button to start the process. Streaming logs will display as build tasks process in the cloud. You can leave the page at any time with no impact to the build process.
Download Artifacts
To download artifacts:
- Click the disk icon for the desired component
- Repeat for each component
Exit Build
Clicking the Close View of Build Snapshot button above the navigator will close the view of the current build so you can return to the design.
View Previous Builds
You can access all of your previous builds at any time by clicking the Builds button on the top right.
Using Cached Builds
After a project's build completes successfully, the output is cached. If you re-run the build and a component hasn't changed, its cached output is returned instead of running the entire task again, which reduces the time spent waiting so you can get back to integrating sooner. An icon will be displayed next to any tasks that use cached output.
Clear Build Cache
When building a project that has a cached artifacts you can choose to discard them and start a new build. For example, if the code in your linked repository changes you may want to clear the cache and start a new build to pull in the changes.
To remove cached artifacts for all components in the project:
- Click the Clear Project Build Cache button in the top left
To remove cached artifacts for a specific component:
- Select a component and click the Clear Component Build Cache button in the bottom left
Troubleshooting Failed Builds
If your build has failed, you can view logs and error messages to identify the issue. To access past builds, click on Builds in the upper right. Select your failed build. Review the logs and error messages to determine the cause of the failure.