Verifier: Test Software in GitLab CI
We recommend that you complete Visualize a Project Design and Verifier: Test a Software Component before moving on to this tutorial.
BLUF
In this tutorial, you will set up testing for a software component in GitLab CI using Tangram Pro Verifier. The scenario below will guide you through setting up a Tangram Pro project for an existing component, configuring a GitLab CI pipeline to test the component, and running the Verifier tests in CI to see the results.
This tutorial will reference the Verifier in CI documentation many times.
- Project: Prepare a Tangram Pro project for the Rotating House software controller
- Configure: Create the software's message model
- GitLab: Set up Verifier in CI for a new GitLab repo which will test this component
- Run the Test: Run the CI pipeline and see the test results
This is a technical tutorial: to complete this tutorial, you will need to commit files to a GitLab repo, modify GitLab CI pipeline YAML, and edit Dockerfiles. We don't expect every user of Tangram Pro to be familiar with all of these concepts, and we'll provide some assistance on these topics, but if you're not familiar with all of those concepts you'll likely need to reach for outside assistance.
The Rotating House

The Story
Your long career as a software engineer in the world of civil engineering has paid off, and you've made it to the big leagues of the architecture world! You take the jobs that sound most interesting (and pay the best), which has allowed you to snag your most recent gig: developing core functionality for the beach-side rotating home of a rich real estate magnate who plans to stay in the house twice a year. You're creating the software which handles actually rotating the house.
The homeowner wants this rotating house so that they can watch the sunset from their living room balcony, their bedroom, or anywhere else in the house. Rotating the average house isn't possible, of course. This house is circular and built on a large central pillar, which it physically rotates around through a huge ball bearing. Wiring, water, and waste all flow through this central pillar. Large copper strips and a brush system provide easy access points for electric to be connected; in fact, electricity can remain connected even while the house is rotating. Water and waste, however, flow through two separate circular tubes with multiple valved connection points which the rotating section of the house can connect to. This limits the rotation to a few known angles, which the controller will have to handle appropriately.
We're providing the Rotating House software for this tutorial, so you're ready to test the component right away.
Why Verifier?
Verifier lets users do integration testing by running your actual software and testing it while it runs. Usually, this would require putting the software into the real environment it's supposed to be used in, but that can be prohibitively expensive for large systems (like airplanes or hospital networks). By using a software component's model, Verifier can run the component in isolation while still performing integration tests on the software's ability to perform as it should.
If you want to learn more about Verifier and its advantages, check out the Verifier documentation.
Why Verifier in CI?
Your team is using GitLab to store the code and generate the component, and you want to use Verifier to add integration testing to the pipeline. Verifier in Tangram Pro is easy to use and appropriate for many workflows, but it requires you and your team to go to Tangram Pro every time you want to run integration tests. What you'd really like is to test your component every time you push new code to your GitLab repo. Thankfully, Verifier in CI makes that possible!
In this tutorial, you'll take the Rotating House's controller software and test it with Verifier in a GitLab CI pipeline.
Extra Context: What's GitLab? What's CI?
GitLab is a server that stores code. It's based off of a system called git, created by the same person who made the Linux kernel.
GitLab and git allow programmers to change their code and push the new code up to GitLab, and then
easily see just the changes between the previous code and the new code. That helps programmers review changes or revert them if
something went wrong. git is a "Version Control System", and GitLab builds a pretty interface and project management on top.
GitLab CI (CI stands for "Continuous Integration") is a system that automatically runs tools whenever changes get pushed to code. What those tools are is user-defined, so some popular examples might be:
- Run testing tools (like we're going to do!) to make sure the changes didn't cause the code to stop performing it's task correctly
- Run spell checking tools
- Automatically push the code off into the world to do what it should do (after it's been tested, of course).
Create the Project
You should start by creating a new Tangram Pro Team, and then
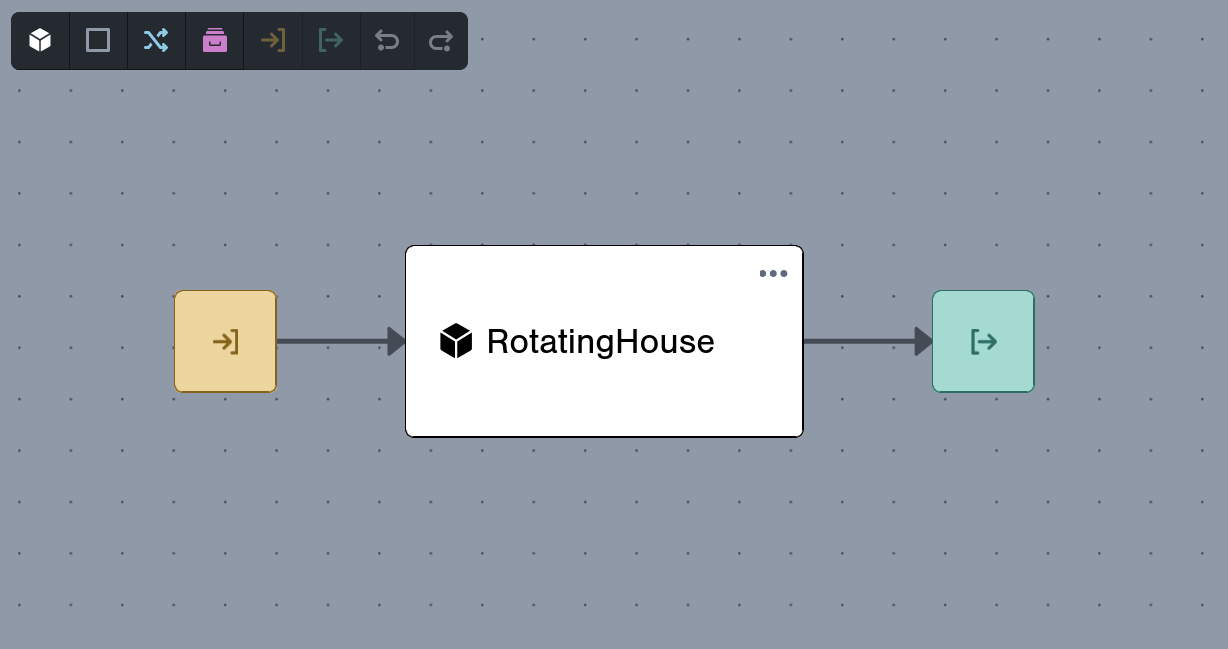
create a new project for that team. Add a single component called RotatingHouse, add the input and output blocks
using the toolbar at the top left of the Design window, and then connect the RotatingHouse component to those blocks.

ZeroMQ
Extra Context: What's ZeroMQ?
ZeroMQ is one of several different transports that Tangram supports. These transports are third-party systems that allow computers and software components to send messages to each other over the internet. As a general rule, transports like ZeroMQ make it easier to know that data will get to its destination, to send data to multiple places at once, or to filter exactly what data a program will receive.
For example, a common way to set up a transport is using a Publish and Subscribe paradigm:
- A home weather station constantly
publishesdata from all its sensors to a ZeroMQ central server - When it sends the data, it separates it based on type: rather than
publishing one big block of data, itpublishes a block of data that's just rainfall, just barometric pressure, and just temperature - The LCD screen above your kitchen sink
subscribes to all of the data so that it can be displayed - Your phone app
subscribes to just the barometric pressure, so that it can give you a notification if you might want a rain jacket that day
ZeroMQ (and other transports like it) make it easy to filter data, but also for each of these senders and receivers to talk to each other without actually knowing how they're doing it: they all just know that they talk to the central server and they let the transport handle the rest.
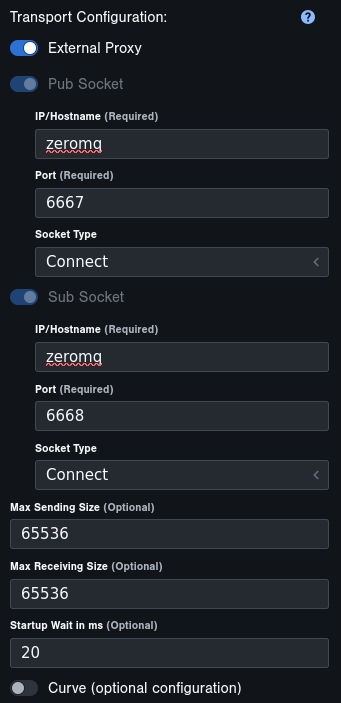
The Rotating House software controller uses ZeroMQ to communicate, so you should add a ZeroMQ transport to the project. Click on the transport after you've created it, and you'll see a number of configuration options which are now available for the transport, including a few currently unset but required connection options.
The Rotating House will use a classic Pub/Sub model
of communication. As you can see, the ZeroMQ transport has a Pub Socket and a Sub Socket.
- Check the
External Proxyoption, which will tell Verifier to connect to a ZeroMQ proxy instead of connecting directly to the component - The
IPfor both the Pub and Sub sockets should bezeromq - The Pub Socket's
Portshould be6667 - The Sub Socket's
Portshould be6668 - The
Socket Typefor both Pub and Sub should beConnect

Message Set
The Rotating House uses an existing message set which is already written in Flex. You'll need to create a new Flex package
with your team as the owner called Tutorial::RotatingHouse, and include the following Flex messages in a new Flex file called messages.flex within that
package. Paste the following code after the automatically generated header at the top of the new file:
/// Listed in a clockwise rotation context
/// E.g., bedroom is the hour hand at 12 o'clock, dining room is the hour hand halfway
///  between 1 and 2
enum Room uint32 {
    Bedroom      = 0;
    DiningRoom   = 1;
    GuestBedroom = 2;
    Jacuzzi      = 3;
    LivingRoom   = 4;
    LoungeDeck   = 5;
    Sunroom      = 6;
    ArtGallery   = 7;
}

message struct RotateCommand {
    currentRoom: Room;
    newRoom: Room;
}

enum ErrorType uint32 {
    /// No problem
    Ok              = 0;
    /// User asked to move to the same room as currently beach-facing
    SameRoom        = 1;
    /// Motor blocked or not working, etc. and rotation couldn't start
    RotationBlocked = 2;
    /// Partway through rotation, an error occurred and rotation couldn't finish
    PartialRotation = 3;
    /// Shower or another device that consumes lots of water is running
    WaterRunning    = 4;
    /// Bathwater, dishwasher, or toilet is currently emptying
    WasteRunning    = 5;
    /// Failed to reconnect water
    WaterBlocked    = 6;
    /// Failed to reconnect waste
    WasteBlocked    = 7;
    /// Received unexpected information from the water controller
    WaterConfused   = 8;
    /// Received unexpected information from the waste controller
    WasteConfused   = 9;
}

message struct RotateStatus {
    error: ErrorType;
    currentRoom: Room;
}

enum ConnectionState uint32 {
    Connected    = 0;
    Disconnected = 1;
}

message struct WaterCommand {
    newState: ConnectionState;
}

message struct WasteCommand {
    newState: ConnectionState;
}

enum WaterBusy uint32 {
    NotBusy    = 0;
    Dishwasher = 1;
    Jacuzzi    = 2;
    Shower     = 3;
    Washer     = 4;
    /// Valve is "busy", e.g. misaligned and reconnection couldn't happen
    Valve      = 5;
}

message struct WaterStatus {
    busy: WaterBusy;
    currentState: ConnectionState;
}

enum WasteBusy uint32 {
    NotBusy    = 0;
    Dishwasher = 1;
    Jacuzzi    = 2;
    Shower     = 3;
    Washer     = 4;
    Toilet     = 5;
    /// Valve is "busy", e.g. misaligned and reconnection couldn't happen
    Valve      = 6;
}

message struct WasteStatus {
    busy: WasteBusy;
    currentState: ConnectionState;
}

message struct MotorCommand {
    degreesToRotate: uint32;
}

message struct MotorStatus {
    degreesRotated: uint32;
}
Component Interface
Back in your project Design, you'll need to configure the Rotating House software's component interface next. The component will send all messages over the ZeroMQ transport with Direct serialization, using the Flex package you just created.
Input messages:
RotateCommand
Output messages:
RotateStatus
Verifier Configuration
Select your component and then jump into the Verify mode for the project and add a new sequence.
The Rotating House needs to handle a lot of different scenarios, but let's start simple: this sequence will describe the Rotating House controller's behavior when a user requests that the house rotate to the room that it's currently already positioned to.
Create a new sequence called Same Room Error. Any other settings can be left as their defaults.
Add the following messages in order, leaving their settings as default:
- Add
RotateCommandas an input message- Ensure the message topic is
messages.RotateCommand(that's how the component will find the data when receiving it over ZeroMQ)
- Ensure the message topic is
- Add
RotateStatusas the response output message- Ensure the message topic is
messages.RotateStatus
- Ensure the message topic is
The RotateCommand message that you pasted into the Flex package a few moments ago has two fields: currentRoom and newRoom.
For this sequence test, we're checking what happens when those two fields are equal, so open the Constraints panel for the
RotateCommand message and add the following field requirements:
- name: newRoom
  valid_values: [{value: self.currentRoom}]
If currentRoom and newRoom are the same, we expect that the Rotating House controller will give us an error message in response.
Open the Constraints panel for the RotateStatus message and add the following field requirements:
- name: error
  valid_values: [{value: 1}]
- name: currentRoom
valid_values: [{value: RotateCommand_1.currentRoom}]You may need to adjust the ID of the RotateCommand message in the RotateStatus constraints from RotateCommand_1 to the
appropriate new value if you've created other sequences or messages (for example, if you created and deleted the sequence once already).
Verifier in CI
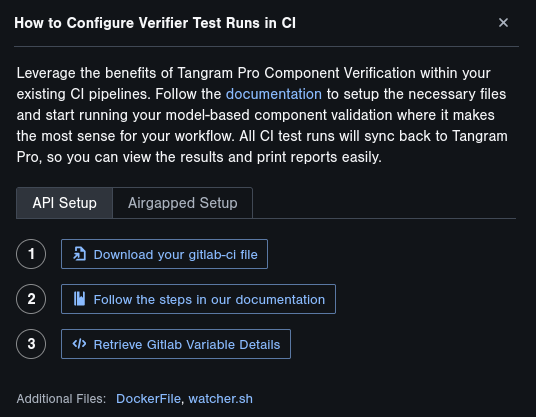
Now that you've configured Verifier using Tangram Pro, click Setup Tests in CI in the top right of the Verify mode. This will
open a panel with instructions for you to follow. Wait to follow these instructions until you've set up a new GitLab
repo using the instructions below: we'll tell you when to return to this panel later.

Set Up a Repo
As you read through the Verifier in CI documentation, you'll notice that Verifier in CI needs an existing GitLab repo and CI file.
Make a new GitLab repo and add your team members to it, then copy and commit the example Dockerfile and watcher.sh from the Verifier in CI documentation into that new repo.
Component Dockerfile
The Verifier in CI documentation describes how to wrap the component's execution with the watcher script, as well as why wrapping the component is necessary. That happens in the provided example Dockerfile, which will be based off of your existing Rotating House image.
You have, of course, already written the Rotating House controller software, and you've already containerized it too. In order to finish wrapping your component image
with the watcher script, all you need to do is modify the FROM line at the top of the Dockerfile you copied into the repo to look like this:
FROM ghcr.io/tangramflex/the-rotating-house:v1.0.0Watcher Script
The watcher.sh script needs to know how to start and kill the component process, as described in the related
Verifier in CI docs.
In the run_on_start function, find the line that looks like <YOUR PROCESS EXECUTABLE> 2>&1 | tee -a $LOGFILE and modify it
so that it starts the Rotating House component like this:
/runway/test/component/component 2>&1 | tee -a $LOGFILEThen, modify the wait_for_kill function to replace the line that looks like pkill <YOUR PROCESS EXECUTABLE> with the code
below to stop the Rotating House controller:
pkill componentRepo CI File
While we can't guarantee any particular method of building containers will work, we think this way will most likely work for you. If Kaniko won't work for you, GitLab has other suggestions, and if your GitLab is configured to allow it you can also use Docker.
Normally, you or a developer on your team would have a GitLab CI file to start with. Since you're using our component as an example, save this
provided base file as .gitlab-ci.yml in your new repo:
Extra Context: What's Kaniko?
Kaniko is a tool designed for building container images in environments where a Docker daemon is not available. It executes builds directly within a container, making it ideal for CI/CD pipelines. Kaniko securely builds images by extracting the filesystem layers and creating the final image without requiring privileged access.
GitLab may be configured in a large variety of ways, however the default behavior does not allow for using Docker directly to build containers. Therefore, Kaniko is a great alternative.
stages:
  - kaniko

kaniko-build:
  stage: kaniko
  image: gcr.io/kaniko-project/executor:v1.23.2-debug
  variables:
    KANIKO_OPTIONS: "--cache --cleanup"
    CONTEXT: .
    DESTINATION: $CI_REGISTRY_IMAGE:latest
    DOCKERFILE: $CI_PROJECT_DIR/Dockerfile
  before_script:
    echo "${CI_REGISTRY_USER},${CI_REGISTRY_PASSWORD}" > /kaniko/reg_creds
  script: |
    mkdir -p /kaniko/.docker

    echo "{\"auths\":{\"$CI_REGISTRY\":{\"auth\":\"$(echo -n $CI_REGISTRY_USER:$CI_REGISTRY_PASSWORD | base64)\"}}}" \
      > /kaniko/.docker/config.json

    /kaniko/executor \
      ${KANIKO_OPTIONS} \
      --context ${CONTEXT} \
      --dockerfile ${DOCKERFILE} \
      --destination ${DESTINATION}
Configure GitLab CI Variables
The Verifier image will be pulled from Tangram Pro, and the GitLab CI file we'll be using will also expect to be able to access the Tangram Pro API. For these steps to work, you'll need to follow the GitLab CI/CD variable steps provided in the Verifier in CI documentation.
After creating the three variables you'll need, return here.
Configure Stages
When you click the Setup Tests in CI button, it opens a dialog with a button to Download your gitlab-ci file. Clicking that button
produces a generated file that contains a default set of CI jobs to run Verifier in CI. You'll need to combine the existing GitLab CI
file that you copied from the steps above with this generated CI file from Tangram Pro.
Let's call the CI file you previously added to the repo with the Kaniko step the base CI file, for clarity in the steps below.
Download the CI file from Tangram Pro now, and then update the base CI file with configuration from the downloaded file:
- Combine the
stagesin your base CI file with thestagesin the downloaded file- Copy the stages from the downloaded CI file from Tangram Pro as list items below the
kanikostage in the base CI file
- Copy the stages from the downloaded CI file from Tangram Pro as list items below the
- Copy the
variablessection from the downloaded CI file into your base CI file, below the stages - Copy everything after the
variablessection from the downloaded CI file to the bottom of your base CI file, after thekaniko-buildjob
Set Up ZeroMQ and the Rotating House component
Next, you'll need to configure the transport and
the component on the verifier:test_component CI job.
Find the verifier:test_component job in your GitLab CI file, then replace the existing services section:
  services:
    # Set up the transport proxy that your component requires to talk to Verifier
    - name: $TPRO_HOSTNAME/registry/public_images/zeromqproxy:1.0.2
      # This should match the transport hostname you specified in Tangram Pro
      alias: zeromq
    # Your modified component image using the watcher script
    - name: $CI_REGISTRY_IMAGE:latest
      alias: rotatinghouse
      variables:
        TANGRAM_TRANSPORT_zeromq_transport_HOSTNAME: zeromq
This will configure the Verifier test job to use ZeroMQ to talk to the component, using the ZeroMQ proxy image available in Tangram Pro. It will also set up the Rotating House component, wrapped with the watcher script, for testing.
Run the Pipeline
If you haven't already, save and commit your changes to the repo, then push them to GitLab!
Normally, the example CI will run whenever a new commit is pushed to the GitLab repo. Depending on the order in which you added files and set variables,
you may need to rerun the pipeline manually for it to succeed. You can do that from the GitLab Build > Pipelines menu by clicking on New Pipeline
in the top right and then clicking Run pipeline (no variables are required on this page).
Results
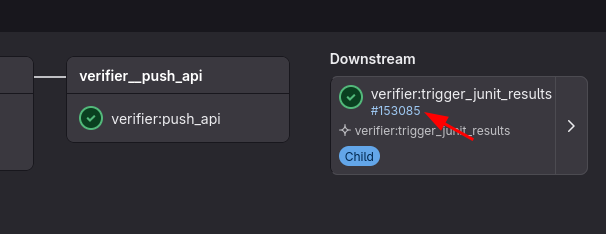
After the verifier::push_api job finishes in the GitLab CI pipeline, the results will be pushed up to Tangram Pro and you can view them there.
You can also see a simplified results view directly in GitLab.
- Check out the
View Testspanel within the Verify mode of Tangram Pro to see test results - View the Test results in GitLab
- View the pipeline that ran by going to
Build > Pipelinesin the GitLab menu - The
Stagesof the successful pipeline will have a single stage on the right end with an arrow pointing to it: this is the triggered "downstream" job that displays Verifier results. Click on the blue pipeline link to open the triggered pipeline. - View the tests
- View the pipeline that ran by going to


Next Steps for Exploration
Verifier in CI has a few neat tricks up its sleeves that you could try out:
- You can tell Verifier in CI to run multiple times by changing the variables in the
.gitlab-ci.ymlfile as described in the docs. Try changing the number of runs, then seeing how that's made visible in the test results - Verifier in CI will automatically pull the latest configurations from Tangram Pro! Add the sequence described below, then run the GitLab pipeline again to see the test results
New Sequence: Water Disconnect Failure
As described earlier, the Rotating House needs to disconnect the water and waste pipes before it can rotate. If the water is currently in use, the controller will need to warn the user that it can't currently initiate rotation, rather than break the water flow. That sequence looks like this:
- Add this new sequence in the Verify mode of the project
- Write constraints for each message in the sequence using the constraints documentation.
- Rerun the pipeline tests