Implement Generated Code
Well, you've generated some code with Tangram Pro™. So, now what? How about taking the Component Software Interface (CSI) for a test drive? After all, the whole point of the CSI is to quickly connect components with a reliable, reusable interface so that you can focus on developing your applications rather than managing the interactions between them.
You'll learn how to:
- Create a local Linux testing environment
- Leverage your CSI generated by Tangram Pro™
- Run an end-to-end test of your CSI
- Visualize the program's behavior with OpenAMASE
What is a CSI?
A CSI is a lot like an application programming interface (API) for an embedded system component. To be sure, there are differences. Rather than thinking of web servers and enterprise applications, you might think of navigation, autonomy, and sensor components on a UAV. The CSI is all the code needed to support the sending and receiving of the messages that you've selected in your design (such as the OpenUxAS LMCP messages we specified in the previous tutorials).
When you configure a build for a component, Tangram Pro™ does all the heavy lifting for you. The component interface you've defined, using simple dropdown menu selections, is output into robust C++ (or Rust) source code. This ready-to-run code not only contains objects that represent your selected messages, but also the appropriate setter and getter functions for each message, transport libraries (ZeroMQ, ActiveMQ, RabbitMQ, or Kafka), serialization/deserialization libraries, and a variety of test code.
Packaging all of this up into a set of executables means you can spend your development time on the behavior of the components themselves, rather than the connections between them.
Step 1: Create a Linux Virtual Machine
Next, you are going to create an Ubuntu 20.04 LTS virtual machine using VirtualBox.
If you are already using a Linux machine that is running Ubuntu 20.04 or 22.04 LTS, you many want to skip to Step 2.
To download VirtualBox
- Navigate to the VirtualBox Downloads page
- Click the appropriate download for your host machine, either
Windows hostsorOS X hosts - Click Open to open the downloaded file and launch the VirtualBox installer
- Double Click
VirtualBox.pkgand follow the prompts to complete VirtualBox installation - Launch the VirtualBox application
With VirtualBox installed you are nearly ready to create the Ubuntu 20.04 VM. But let's make sure you have an Ubuntu image with long term support (LTS).
To download Ubuntu 20.04 LTS
- Navigate to the Ubuntu Releases page
- Download the desktop image for Ubuntu 20.04 LTS
Great! Now let's head back to VirtualBox and set up that VM to use as a testing environment.
As you set up your VM in VirtualBox, use the name Tangram CSI Test to mirror the remainder of the instructions below.
To create a Ubuntu 20.04 VM with VirtualBox on Mac OS
If your host machine is using Mac OS, please refer to this video for step by step instructions:
To create a Ubuntu 20.04 VM with VirtualBox on Windows
If your host machine is using Windows, please refer to this video for step by step instructions:
Whew! You are almost there. If you are unfamiliar with setting up an Ubuntu image on a VM that may have felt like a lot of steps to get your testing environment created. Hopefully, it was a smooth process. Now you should see your Tangram CSI Test VM listed in the OracleVMVirtualBox Manager.
Be sure to add the VirtualBox Guest Additions Image. If you missed it in the videos, installing the VirtualBox Guest Additions will allow you to go full screen with your VM while retaining resolution and create shared folders. To add VirtualBox Guest Additions, run this command from the VM terminal:
sudo apt install build-essential dkms linux-headers-$(uname -r)
Then,
- In the VirtualBox menu click Devices
- Click Insert Guest Additions CD Image...
- Restart the Tangram CSI Test VM
Step 2: Install Linux Dependencies
There are a few tools your VM will need to set up your testing environment and successfully run the end to end test. Next we're going to install:
- ant
- openjdk
- git
To add the necessary prerequisites to your VM
- Open Terminal in the Tangram Test CSI VM
- From the VM Terminal run the following command to install the first prerequisite:
sudo apt-get install ant
Following the example above, run the following commands to instal the other prerequisites.
sudo apt-get install openjdk-11-jdk
sudo apt-get install git
sudo adduser $USER vboxsf
Step 3: Clone and build OpenAMASE
With the prerequisites in place, the next step is to clone the OpenAMASE repository and verify that the application will build.
What is OpenAMASE?
Developed by the Air Force Research Laboratory, Aerospace System Directorate, Power and Control Division, OpenAMASE is "a simulation toolset for the analysis and demonstration of aircraft automation and autonomy. OpenAMASE includes the necessary components to create scenarios, simulate aircraft with basic EO/IR cameras, and interact with control algorithms to command aircraft in a scenario."
This means it is an accessible tool, ideal for the purpose of running a end-to-end test of your Tangram Pro™ CSI. Using OpenAMASE will allow you to see a simulated UAV communicating the AirVehicleState and AirVehicleConfiguration LMCP messages to two other simulated UAVs.
For a full description of OpenAMASE, check out the OpenAMASE README.md.
To clone and build the OpenAMASE repository
- In the Tangram CSI Test VM terminal run the following command to clone the OpenAMASE repository
git clone https://github.com/afrl-rq/OpenAMASE.git && cd OpenAMASE
- Change directories with the following command in the VM terminal
cd OpenAMASE
- Build the the code with the following command in the VM terminal
ant jar
- Now, verify that the OpenAMASE application will run with the following commands in the VM terminal
cd run/linux
sh Common.sh "--config" "config/amase"
At this point OpenAMASE will build and you'll see the application running.
Step 4: Run an OpenAMASE scenario
Now let's take advantage of OpenUxAS which contains an example scenario that is much more interesting than the default scenarios in OpenAMASE.
Clone OpenUxAS
- Open a new Terminal tab
- Enter the following commands to clone the OpenUxAS repository
cd ~
git clone https://github.com/afrl-rq/OpenUxAS.git
Select a Scenario
- Within OpenAMASE, click File and select Open Scenario
- Click the dropdown menu at the top, next to the listed file path
- Locate the OpenUxAS folder that you cloned
- Double click OpenUxAS/
- Double click examples/
- Double click 02_Example_WaterwaySearch
- In the Files menu on the right, select Scenario_WaterwaySearch
- Click OK
- Click the play button to run the scenario
A much better scenario don't you think? UAV 400 and UAV 500 are hovering in Nav Mode Loiter at different altitudes and conducting a search. But where is the Tangram UAV?
Step 5: Clone and build CSI test application
Next we're going to clone the Tangram Flex GitHub repository that contains a simple C++ application that uses the Tangram-generated interface code to send LMCP messages to OpenAMASE.
Clone UAS Communications Repository
- Open a new Terminal window and enter
cd ~
git clone https://github.com/TangramFlex/uas-communication-component.git
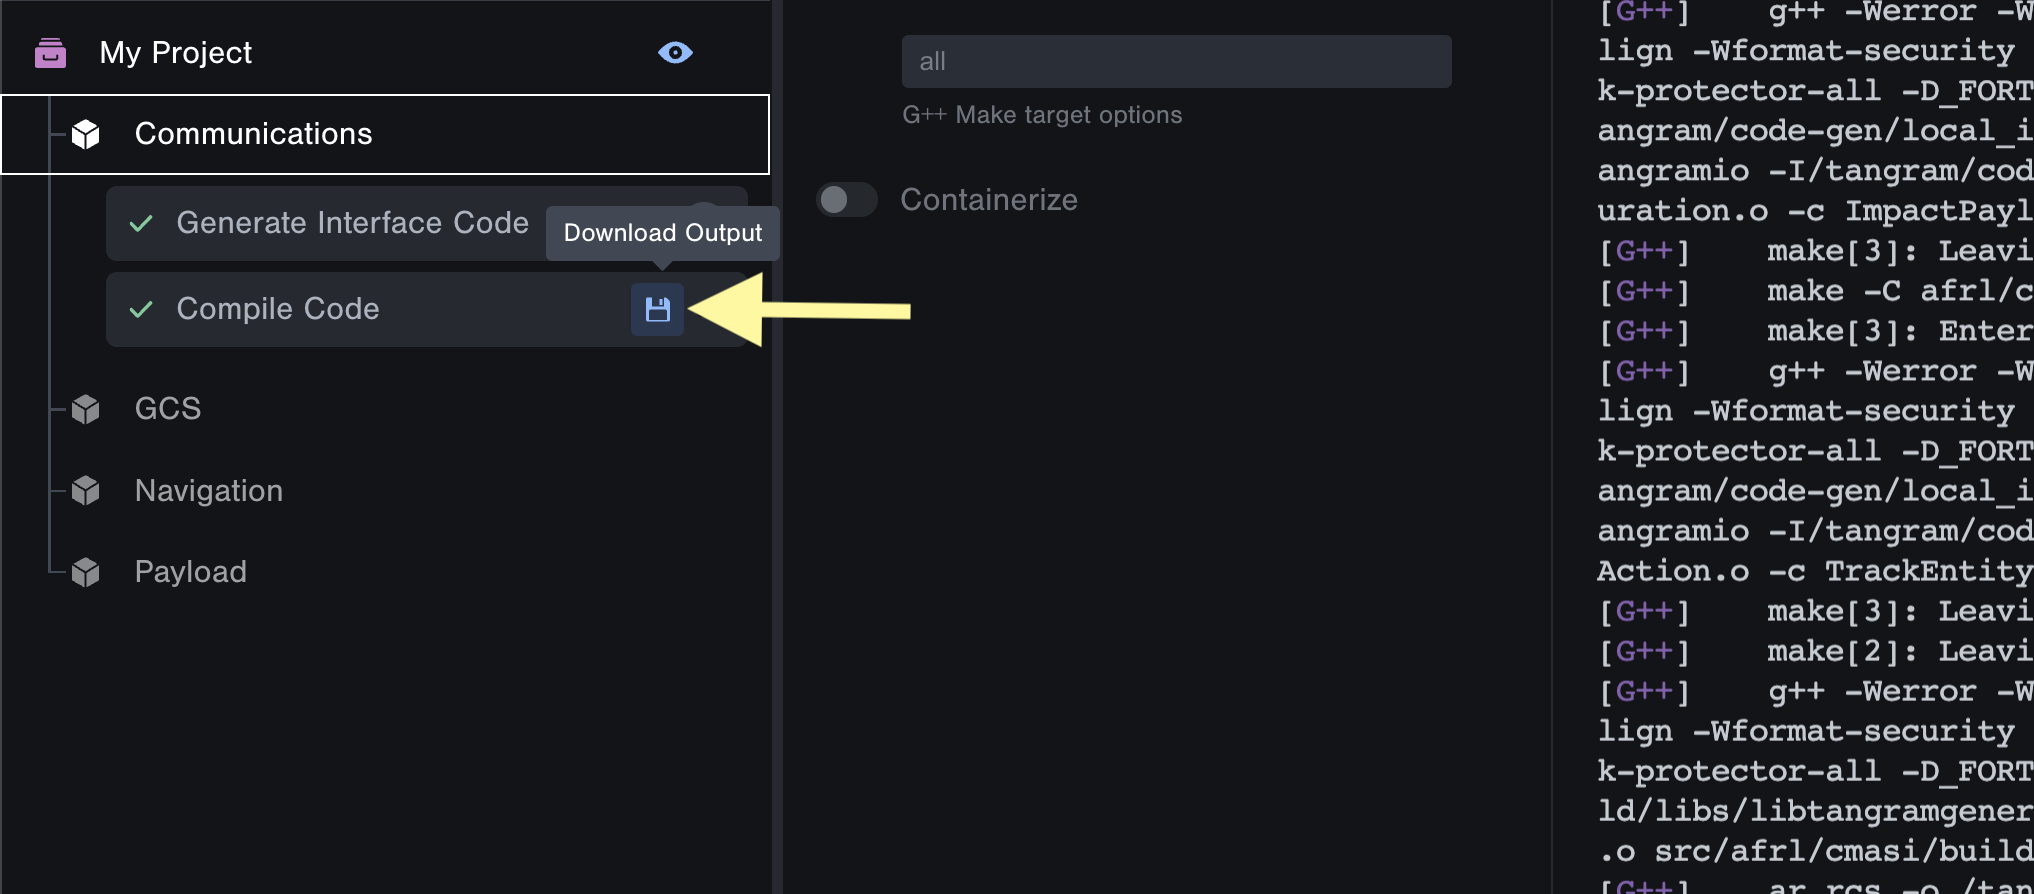
Download CSI from Tangram Pro
- Open Firefox and log in to https://try.tangramflex.io
- Open the project that you created in the previous tutorial
- Go to Builds on the top right to view your previously completed build
- Click on the disk icon in the Compile Code task to download the generated and compiled code
Extract the folder
- Open the downloaded .tar file and extract the code-gen folder into the uas-communication-component folder. Your folder structure should look like:
- uas-communication-component
  - code-gen
Step 6: Run an end-to-end test of your CSI
Now you are going to leverage your CSI to test whether the UAS Communication Component is able to send the AirVehicleState and AirVehicleConfiguration messages.
To run the UAS Communication Component
- Return to Terminal
- Open a new Terminal tab
- Change directories with the following command:
cd ~/uas-communication-component
- Build the
lmcp_senderapp with the following command:
make
- Run the
lmcp_senderapp with the following command:
./lmcp_sender
At this point, you should see the starting, serializing, and sending of the AirVehicleState and AirVehicleConfiguration messages to by the UAS Communication Component in the terminal window. Let's take a look at this in OpenAMASE.
To visualize the behavior of the system with OpenAMASE
- With the application still running, click the OpenAMASE icon in the VM sidebar on the left
- If the OpenAMASE scenario timed out, click the play button to restart it
And there it is! The Tangram UAV leveraging the CSI you generated with Tangram Pro™ to send the required AirVehicleConfiguration and AirVehicleState messages.
Cheers!
By completing this tutorial, you've learned to implement the CSI generated by Tangram Pro™ in a local testing environment!
Check out what you accomplished:
- Created a local testing environment with VirtualBox and Ubuntu 20.04 LTS
- Leveraged the CSI generated by Tangram Pro™ to communicate the specified messages
- Ran an end to end test of the CSI
- Visualized the behavior of your simple system using OpenAMASE
If you want to know more about CSIs in Tangram Pro™, take a look at our blog posts.