Design a Data Flow
What is a Data Flow?
Tangram Pro™ Data Flows make it easy to visualize, understand, and validate API flows through a system of components. This tutorial provides everything you need to know to create data flows, add API specifications and explore an example model.
In this tutorial you'll learn how to:
- Upload API Resources
- Inspect API endpoints and schemas
- Design a Data Flow through a system of components
Step 1: Manage API Resources
Before we create a Data Flow, let's explore Tangram Pro's API management tools. Understanding API specifications can be a challenge, especially with complex systems. That's why we built a robust API explorer inside Tangram Pro!
All you have to do is upload an OpenAPI Specification (OAS) YAML file, and Tangram Pro will validate and visually breakdown all the API endpoints and schemas contained inside it and provide example request and response bodies. Your uploaded OpenAPI YAML files are called API Resources in Tangram Pro.
Let's get started!
1 – Download example files and upload v.0.6
- Download the example OpenAPI files by clicking this link
- Go to User Settings by clicking on your profile image on the top right
- Select API Resources
- Click Add API Resource and select a YAML file to upload
- Select
openapi-v0.6.yaml, which contains an error inside it. Tangram Pro will display error details and prevent the upload.

Great! Now that you've seen what an invalid upload looks like, let's upload a newer version of the schema that has the syntax errors resolved.
2 – Upload a valid OpenAPI file
- Click Upload new file to choose a different file
- Select
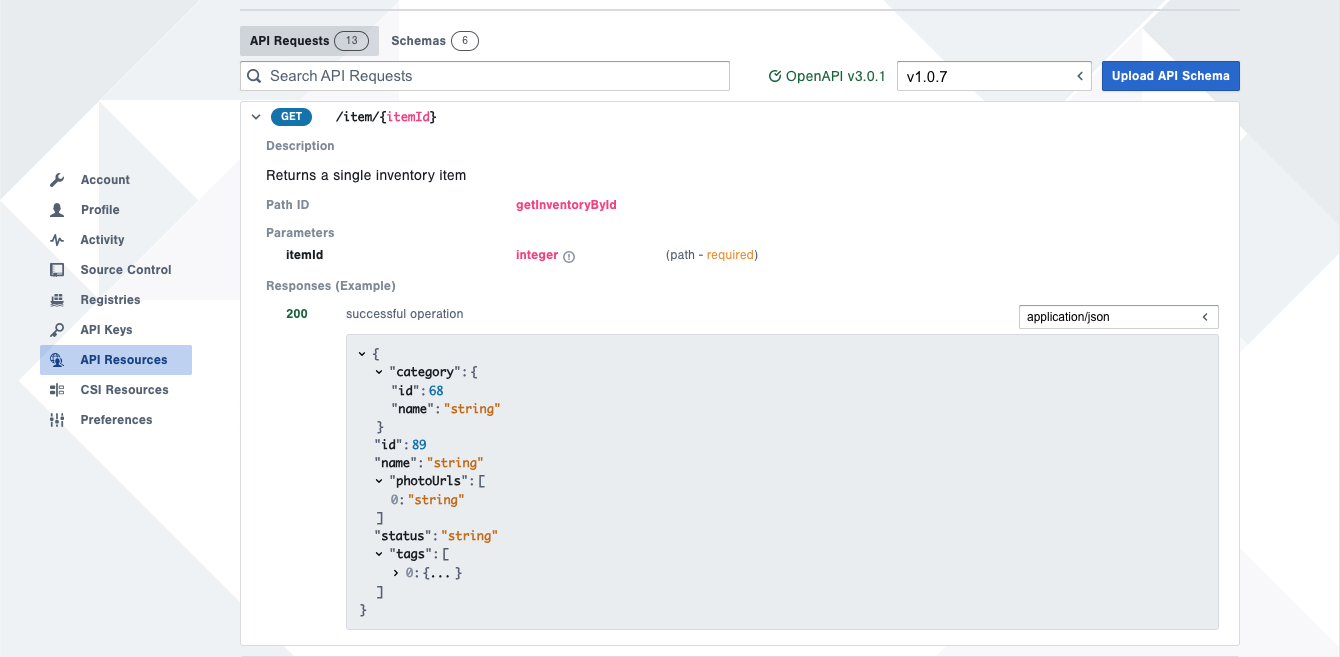
openapi-v1.0.7.yaml, then Confirm and Create. - Tangram Pro provides tools to explore each API request and schema in detail. Click on the first request
GET /item/{itemID}to inspect it. - Click on the Schemas tab to inspect its data structures
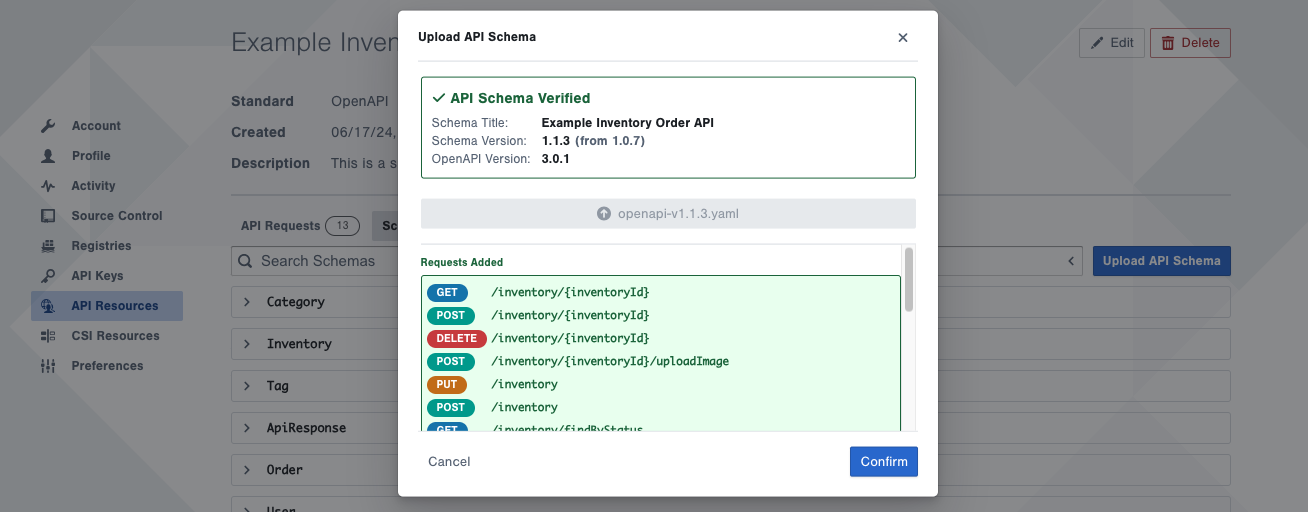
3 – Upload a newer OpenAPI file with endpoint changes
API schemas can change often. In Tangram Pro, you can easily upload a new version of your OpenAPI file and it will show you the diff – which endpoints were added and removed – so there are no surprises in the design.
- Click Upload new file to choose a different file
- Select
openapi-v1.1.3.yaml, and Tangram Pro will you show what has been added and removed. - Click Confirm
- See how the list of API Requests has been updated.
Excellent! Next you will make use of this API Resource inside a Data Flow.
Step 2: Start a new Project Design
Create a new project to design a system in.
- Go to Projects and click New Project
- Enter a Project Name
- You can associate a team to your project with the Select Owner dropdown menu. Let's keep
Personal (You)selected for now
The system you'll design includes 3 components: frontend, backend and datastore. Let's add those next.
- Click the Add Component button
- Click anywhere on the stage to place it
- Change its name to
frontendby double-clicking on the name - Add 2 more components named
backendanddatastore
Step 3: Add a Data Flow
Now that you have some components in the project, you can add a Data Flow and start laying out the flow of API requests.
1 – Create a new Data Flow
- Click the + button next to Data Flows on the left-hand side.
- Enter
Get Inventory Itemfor the name and click Create Data Flow
2 – Add a step to the Data Flow
- Draw a connection from
frontendtobackendby clicking and dragging from the edge of thefrontendcomponent - Click on Add Step Annotation and enter
GET inventory item - Next, select an API Request for the connection. You'll see that target component has no API Resources associated with it yet so let's do that next:
- Click the link for the
backendcomponent on the right-hand side - Click Add, and choose your API Resource
- Click the link for the
- Now you can select an API endpoint. Choose
GET /inventory/{itemID}
3 – Add another step
- Draw a connection from
backendtodatastoreby clicking and dragging from the edge of thebackendcomponent - Click on Add Step Annotation and enter
GET item data - Same as before, there's not an API Resource associated with the
datastorecomponent yet.- Click the link for the
datastorecomponent on the right-hand side - Click Add, and this time click the Create New API Resource link
- Upload the example
openapi-myS3.yamlfile you downloaded earlier.
- Click the link for the
- Now you can select an API endpoint. Choose
GET /{folder}/{item}
In the scenario where you do not have your API specifications available, you can still sketch out Data Flows with temporary steps that you can update later.
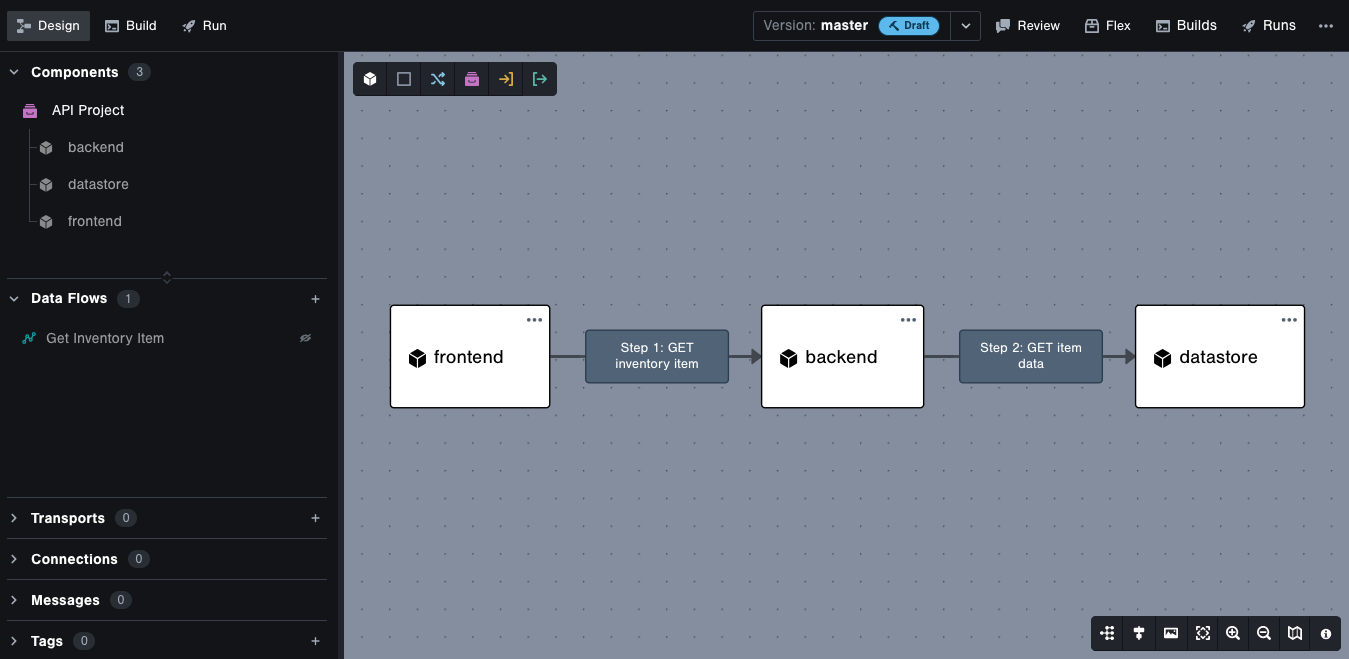
4 – Walkthrough the Data Flow
Click the play button to walkthrough the Data Flow step-by-step.

Cheers!
By completing this tutorial, you've learned how to design a Data Flow in Tangram Pro!
Check out what you accomplished:
- Uploaded API Resources
- Inspected API endpoints and schemas
- Designed a Data Flow through a system of components
You can have multiple Data Flows in each project. For further exploration, try adding another Data Flow that connects with the same components.